F.A.Q.s

by Kevin OBrien on May 16th, 2013

 HOW DO I PACK UP MY REF-3 FOR SHIPMENT?                                                                                                                                                                                                                
We wanted to take the time out to show our customers the proper way to pack up the YFS Ref-3 SE music server transport for shipment. If these steps are not followed, the Ref-3 will be damaged during shipment and the customer will be responsible for repair costs.

Follow these simple steps to pack the Ref-3 before shipment.

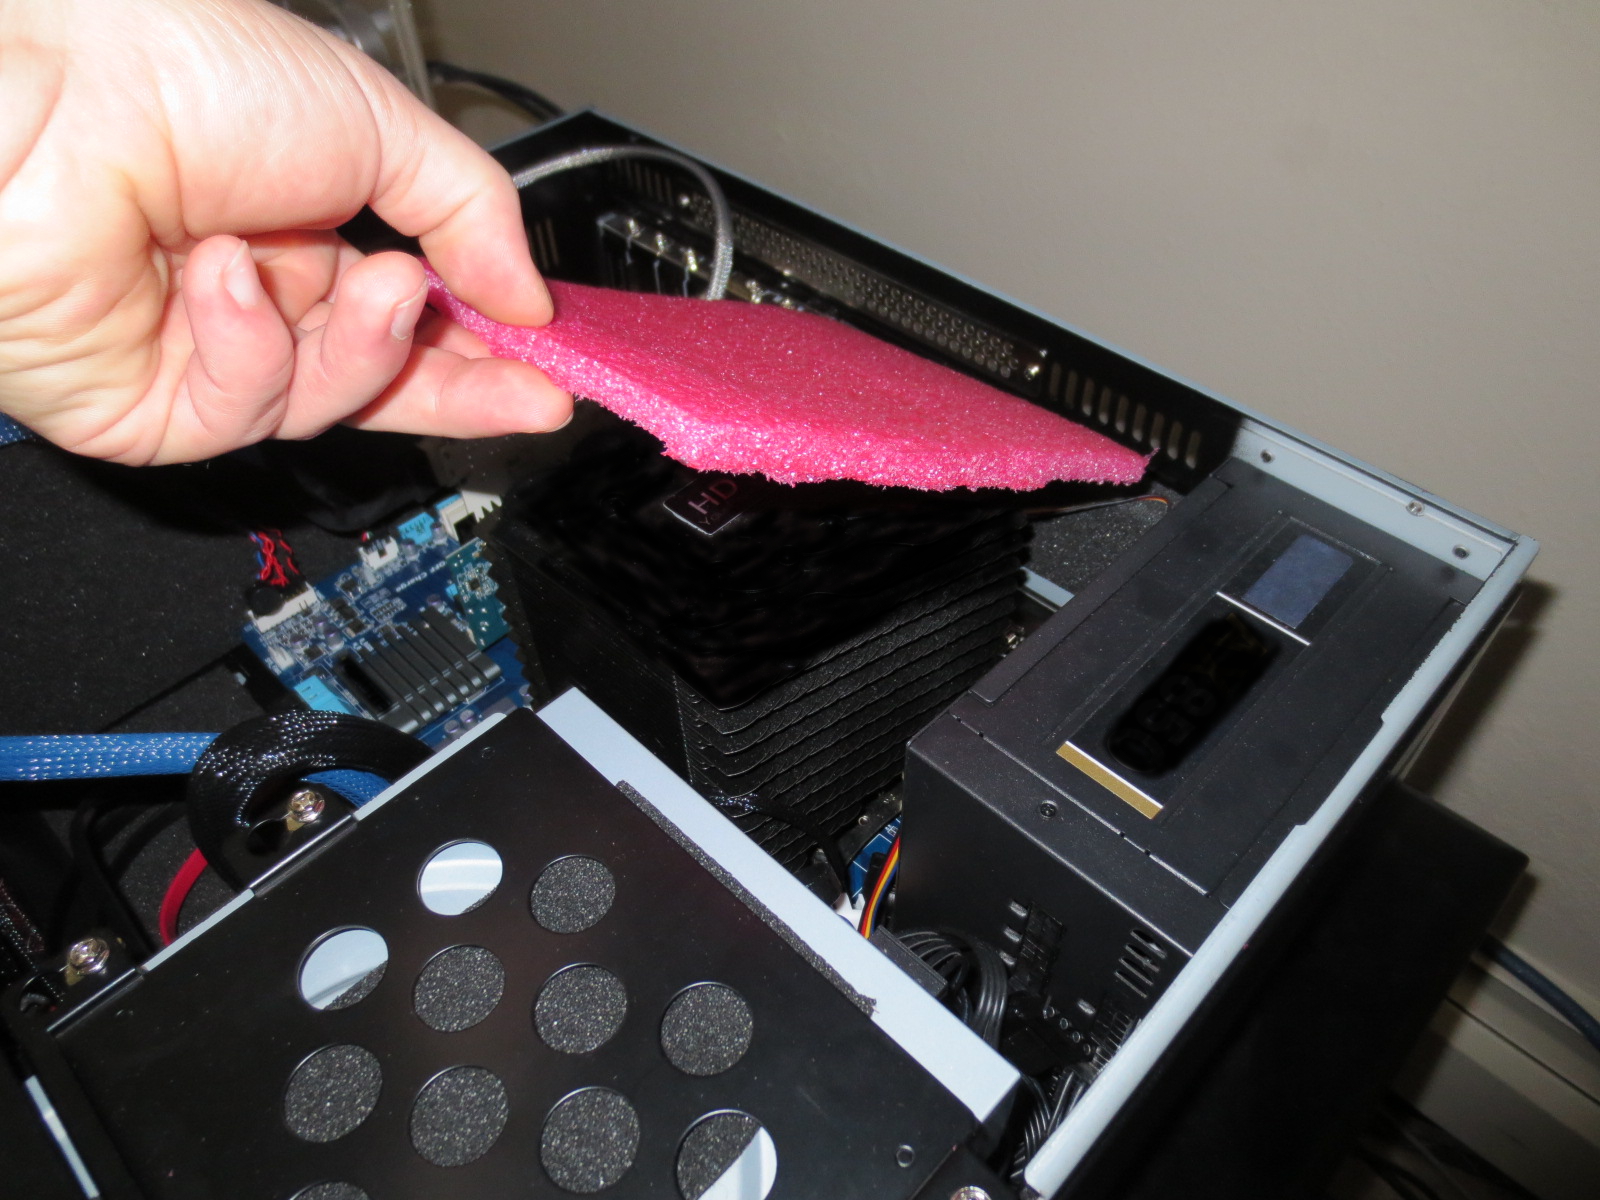
1.) Open the top cover.


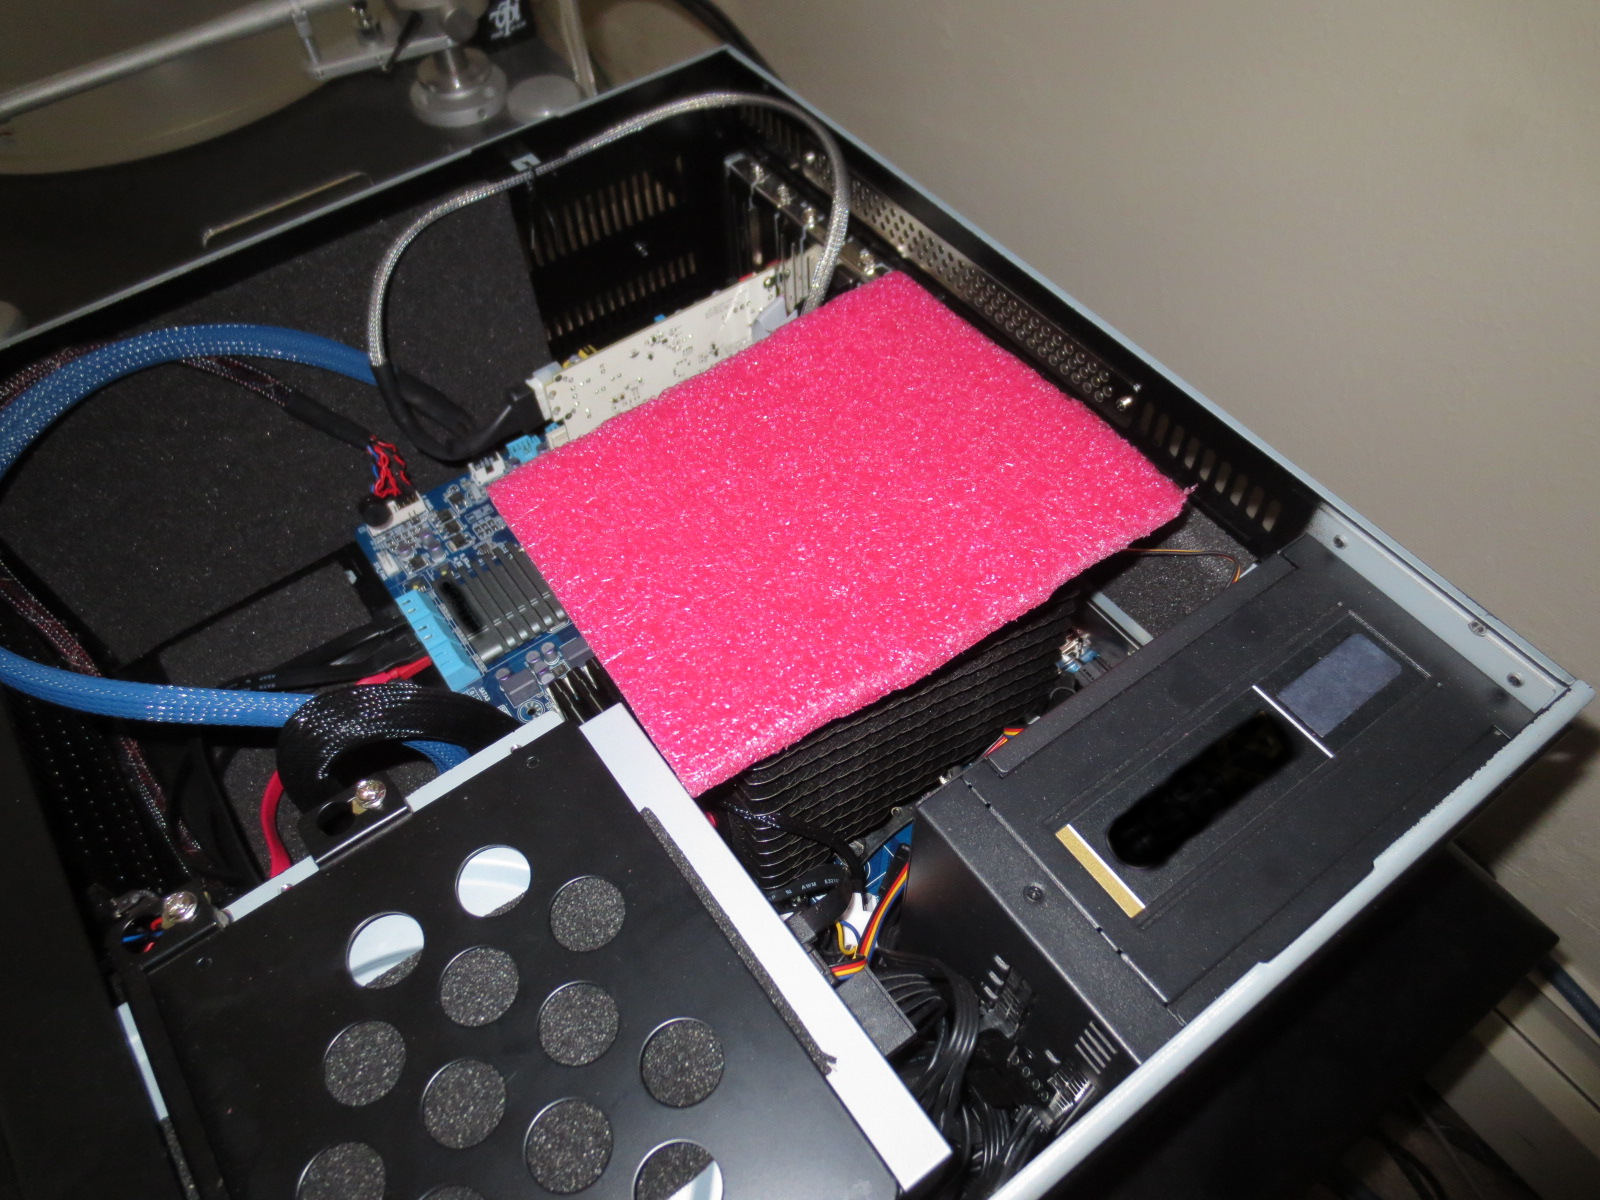
2.) Place the ~ 1/4" piece of foam over the heat sink. If the foam insert has been misplaced, any foam piece approximately the same size as the original will do. Place the foam in an anti-static bag just to be safe. The pink foam insert we supply is anti-static in nature. If you need another insert for shipping your Ref-3 and you have misplaced the original insert, please contact us and we'll send you another insert. DO NOT SHIP THE REF-3 WITHOUT THE FOAM INSERT IN PLACE!


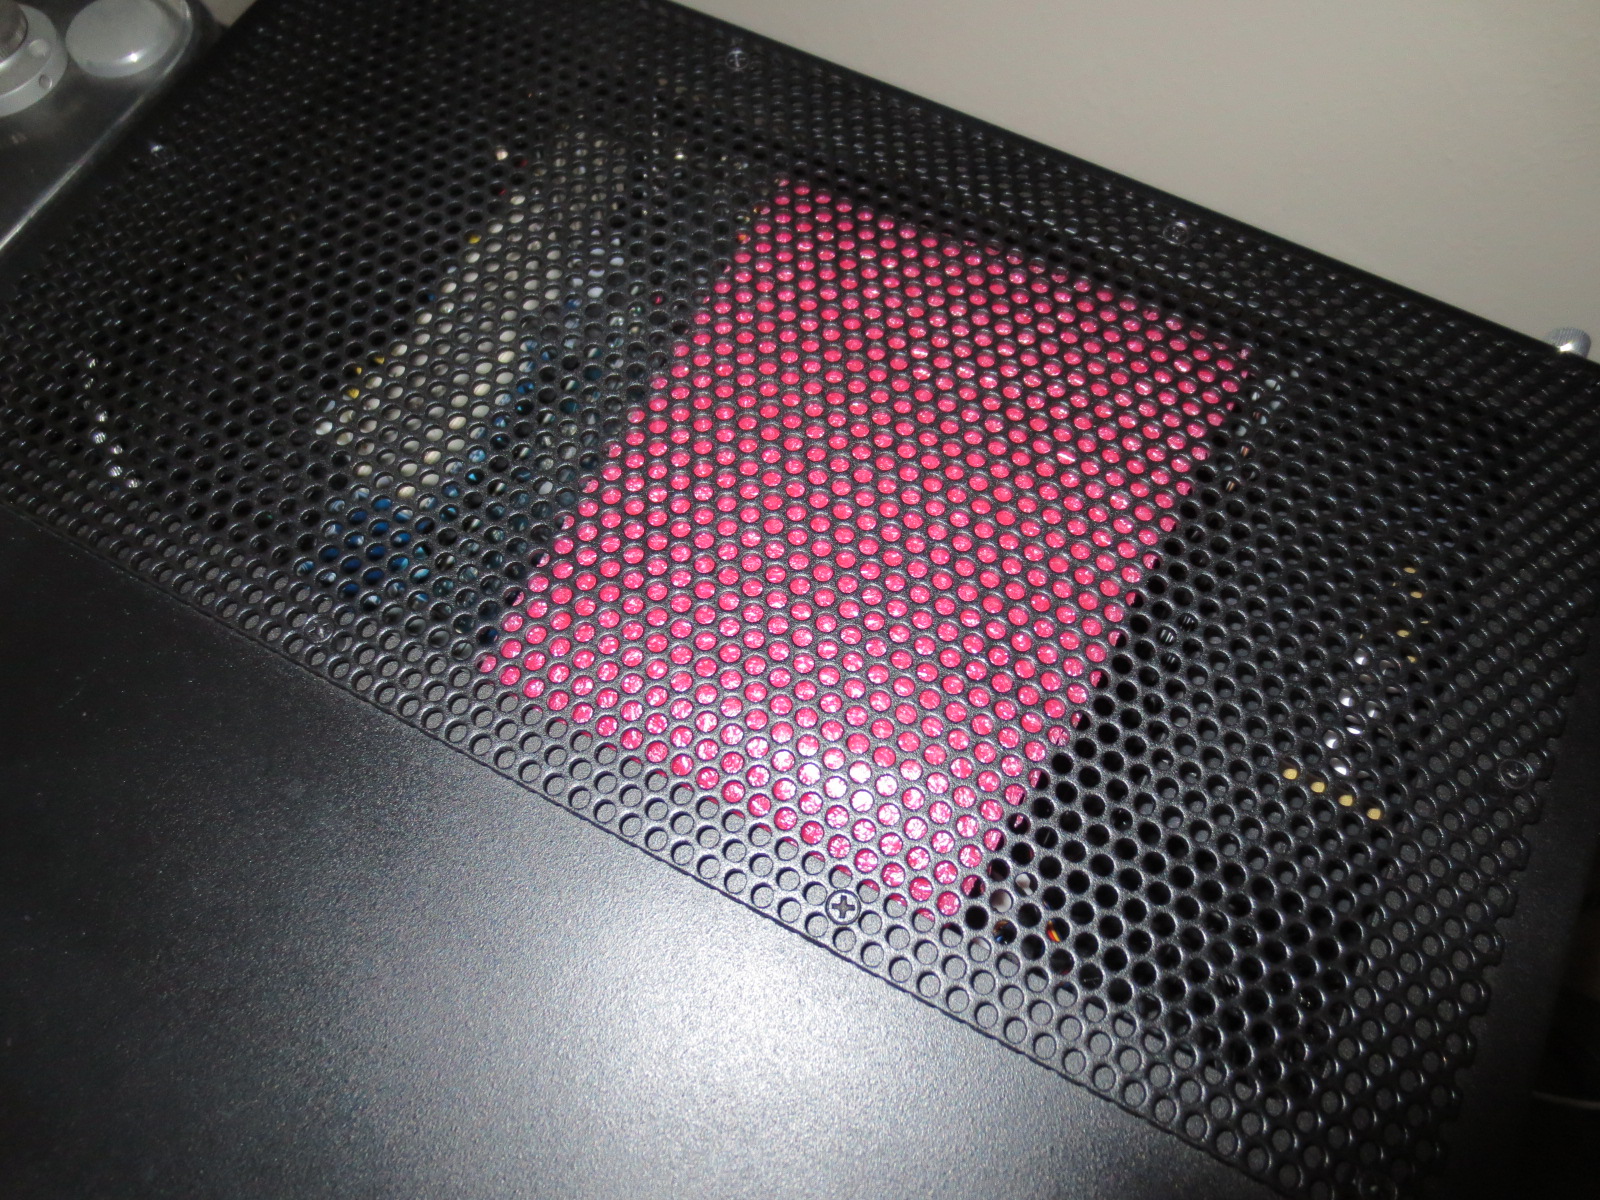
3.) Place the top cover back on the Ref-3. Sandwich the foam insert between the top cover and the heat sink. (This happens automatically) Now your Ref-3 is ready to be shipped.


THANKS for reading! These steps are crucial for transporting the YFS Ref-3 successfully and must be followed in order to do so. 

-YFS Design Team


by Mike OBrien on 03/08/2012

 WHAT DO WE DO HERE AT YFS EXACTLY?

A lot of folks are asking us what we do. I figured I'd spell it out exactly for everyone so there's no confusion. Read below for a look into what we're trying to accomplish here at YFS.

We’re often asked about the availability of the custom equipment on our website, and what exactly do we do. First of all, we have day jobs, music and electronics are our passion. Years of designing low noise aerospace electronics, precision instrumentation, professional audio, and consumer electronics have heavily influenced our audio designs. Principles and techniques developed in these disciplines are applied to audio system design. It isn’t a monumental task (though tricky sometimes) to design a reference level amplifier based on design principles developed in the RF communications, instrumentation, and power electronics fields. Many of the preferred topologies and concepts were developed in the 50’s, 60’s, and 70’s. The same can be said of cable design. Many of the standard power supply concepts employed for decades in the instrumentation world are just now finding their way into audio. It amazes me the audiophile community is just figuring out that a power supply influences circuit performance. Some of the lame designs available (at outrageous prices) are appalling. One of the objectives of this website is to show that there is no magic in audio design and many “new” discoveries are resurrections and slight modifications of old designs.

We have been making custom audio electronics for 30 years. The operative word is custom. We have no standard products, just basic designs. I guess we can be thought of as an engineering services house for the audio community. Along with our own designs, we modify, optimize, and repair commercially available equipment. 

Typically, a customer will audition a circuit in our listening room (with their source and speakers if they choose) to decide what topology they like. They determine the component front and rear panel layouts (number of inputs, functions, controls, style, font, color, height, etc.) for us to build. There have been several cases where the hardware was double the circuit/electronics cost. We understand that aesthetics is often as important to the customer as the sound. To minimize cost and time we build prototypes with minimalist panels (but still presentable) and concentrate on the inside. We have two graphic artists on staff to assist in the aesthetic design if desired.

One current project involves designing a preamp with a specific tube the customer picked up at an estate sale (over 50 pristine GE NOS dual triodes). The tube is a little known type with perfect characteristics for audio (nice curves!). Special circuit board materials such as ceramic and Teflon have been employed at the customer ‘s request. We have also sold populated and tested circuit boards to customers who want to build their own cases. On the other hand, we have done the metalwork for other DIY’ers who have built their own boards. This is common with power amp builders where we do the critical heat sink design and power distribution.

Solid-state circuitry is not excluded. We personally like tubes because of the ability to play with the sound by swapping tubes (from different manufactures) or even tube types in some cases. Since we deal with SS designs all day, vacuum tube design is an enjoyable break. We have designed and built many MOSFET and bipolar power amplifiers and preamplifiers. Hybrid power amplifier designs are also popular. Currently available IC’s and transistors have amazing performance compared to what was available in the 70’s. Several of our reference quality discrete designs rivaling tube gear have been designed over the years.  

Cables are also a key part of the audiophile system. We use our own interconnects developed from work done in the aerospace and instrumentations fields. There are marginally better cables commercially available with absurd price/performance points. We’ve had several unpleasantly surprised customers that couldn’t tell our cables from their $5000 units they brought to our listening room! We rarely discuss cable design; every manufacturer claims theirs is best for various reasons. We have applied basic physics and engineering to develop cost effective designs using relatively common material. It is amazing what can be done with a little geometry, electromagnetics, and materials science. If there’s an interest, we will post some work done on active shielding and EM noise cancelation for an electron microscope facility. 

The least addressed part of the audiophile system is room acoustics. Often a music reproduction system is actually a living room or family room not exactly optimized for sound reproduction. We have designed and built acoustic treatments for several customers to fit into their décor. After analyzing the room (modal, absorption coefficients. etc.) a set of treatments are designed. Our main listening room has an array of diffusers and absorbers to neutralize the room as much as possible. Customers are amazed at the difference in imaging and overall frequency response of their speakers in a properly treated room. Our acoustics experience extends to speaker design. We have developed several sets of reference speakers (to technically challenge ourselves), but we have our favorite commercial units (Acoustic Zen, and Von Schweikert) we use as references. We have no desire to build speakers, not even another set for ourselves! :-)

If you’re interested in how we come up with our designs or just want to chat, we’re here to help! Drop us a line and we’ll be glad to design/ build your dream component or just help you with anything audio related.  When we say we’ll help, we mean it.

 -MOB


by Kevin OBrien on 02/17/2012


WHAT TYPE OF SPEAKERS SHOULD I LOOK AT FOR MY SYSTEM?

The age old question of which speakers to look at for your system is a tricky one. Speakers are very personal and as a rule of thumb they are the most important part of your system and I feel should have the most money AND time invested in them. It's fairly easy to swap out amps and sources but usually the speakers are the one component that remains the same in the "constant tweaker's" system.

I prefer to first make a list of manufacturers you like (Von SchweikertVandersteenWilson AudioAcoustic Zen) and are willing to demo IN YOUR OWN LISTENING ROOM. If you are not willing to put in a little extra work in this department you may get frustrated. The work you put into this stage of your system is directly what you will get out. It's never fun hauling big, awkward, and heavy transducers from your local stereo shop into your listening room. Unfortunately, what other option do you have if you really want to know what each speaker is going to sound like in your room? There is no other way.

Find a local shop that will let you demo their offerings for at least 30 days and try and find speakers that have been on loan previously so they are fully broken in. You will not have sufficient time to break in most speakers within the 30-day demo period most high end shops offer so this is very important. Or you could buy your speakers on the used market to avoid this as well. Break-in is not fun and can be excruciatingly painful to perform when all you really want to do is LISTEN to them in your system!

Back to the list. I have found that talking directly to the designer of the speakers you are looking into is the best way to figure out which makes and models are suitable for your room. For instance, you would not want to place Wilson MAXX 2's in a tiny listening environment and vice versa. Ask the designer what the specific recommended models are tuned for music-wise. If you listen to classical and chamber music you do not want a speaker that sounds great with dance music and nothing else. This sounds super-obvious but I've seen it happen before more times than I like to admit.

Your listening room is really your biggest constraint. Money is your next biggest constraint and that is really where most of us just cannot go the extra mile especially in today's economy. This is OK. That is what used gear is for as you can always find somebody looking to upgrade who will be willing to unload their current speakers at a drastically marked down price.

So, narrow down your search to 2 or 3 manufacturers and then contact them and describe your room and listening preferences. They will most likely want to know whether you have room treatment as well. [This is where we come in] They will be able to guide you in the proper direction and they should be able to tell you which models are in your price range and which will perform best for your needs.

Your final step in this process is to LISTEN to them IN YOUR ROOM and make your final decision after letting your system "settle in" to the changes you have made. I would listen for at least two weeks and confirm you have made the correct choice. If not, get a hold of the manufacturer and let them know what your issues are and they should be able to help you find your perfect speaker.

THANKS for reading and keep on listening!

- KOB


by Kevin OBrien on June 6th, 2012

HOW DO I LOGIN REMOTELY TO MY YFS HD REF SERVER?

We wanted to make a video of the remote login process for our Ref-2 music server but we are having issues with our camera so I figured I'd throw up some desktop screen shots from my laptop instead. The steps below should clear up any confusion on how we login remotely to our music servers. This can be done on any laptop, tablet, or smart phone. We do not recommend using a smart phone for an advanced remote as there's not enough screen to work with. It will work, although not as well as a laptop or tablet. Who says you need a keyboard, monitor, and mouse anymore to control your music server? Not us!
 
The remote login process is VERY easy. See the steps below:
 
First step, click on the "Splashtop" icon on your device you will be using for a remote (tablet, laptop, phone, etc. - Windows OR Mac based). We are assuming you have downloaded the "Splashtop Remote App" on your tablet or laptop. If not, get it here. Our YFS server is already running the "Splashtop Streamer" so you won't have to worry about that part of the process...
 
The screen shot below shows the server you're trying to connect to. This shot is what appears after you double-click the "Splashtop" icon which is located on the left-hand side of my laptop screen directly under the "YFS Stuff" folder.


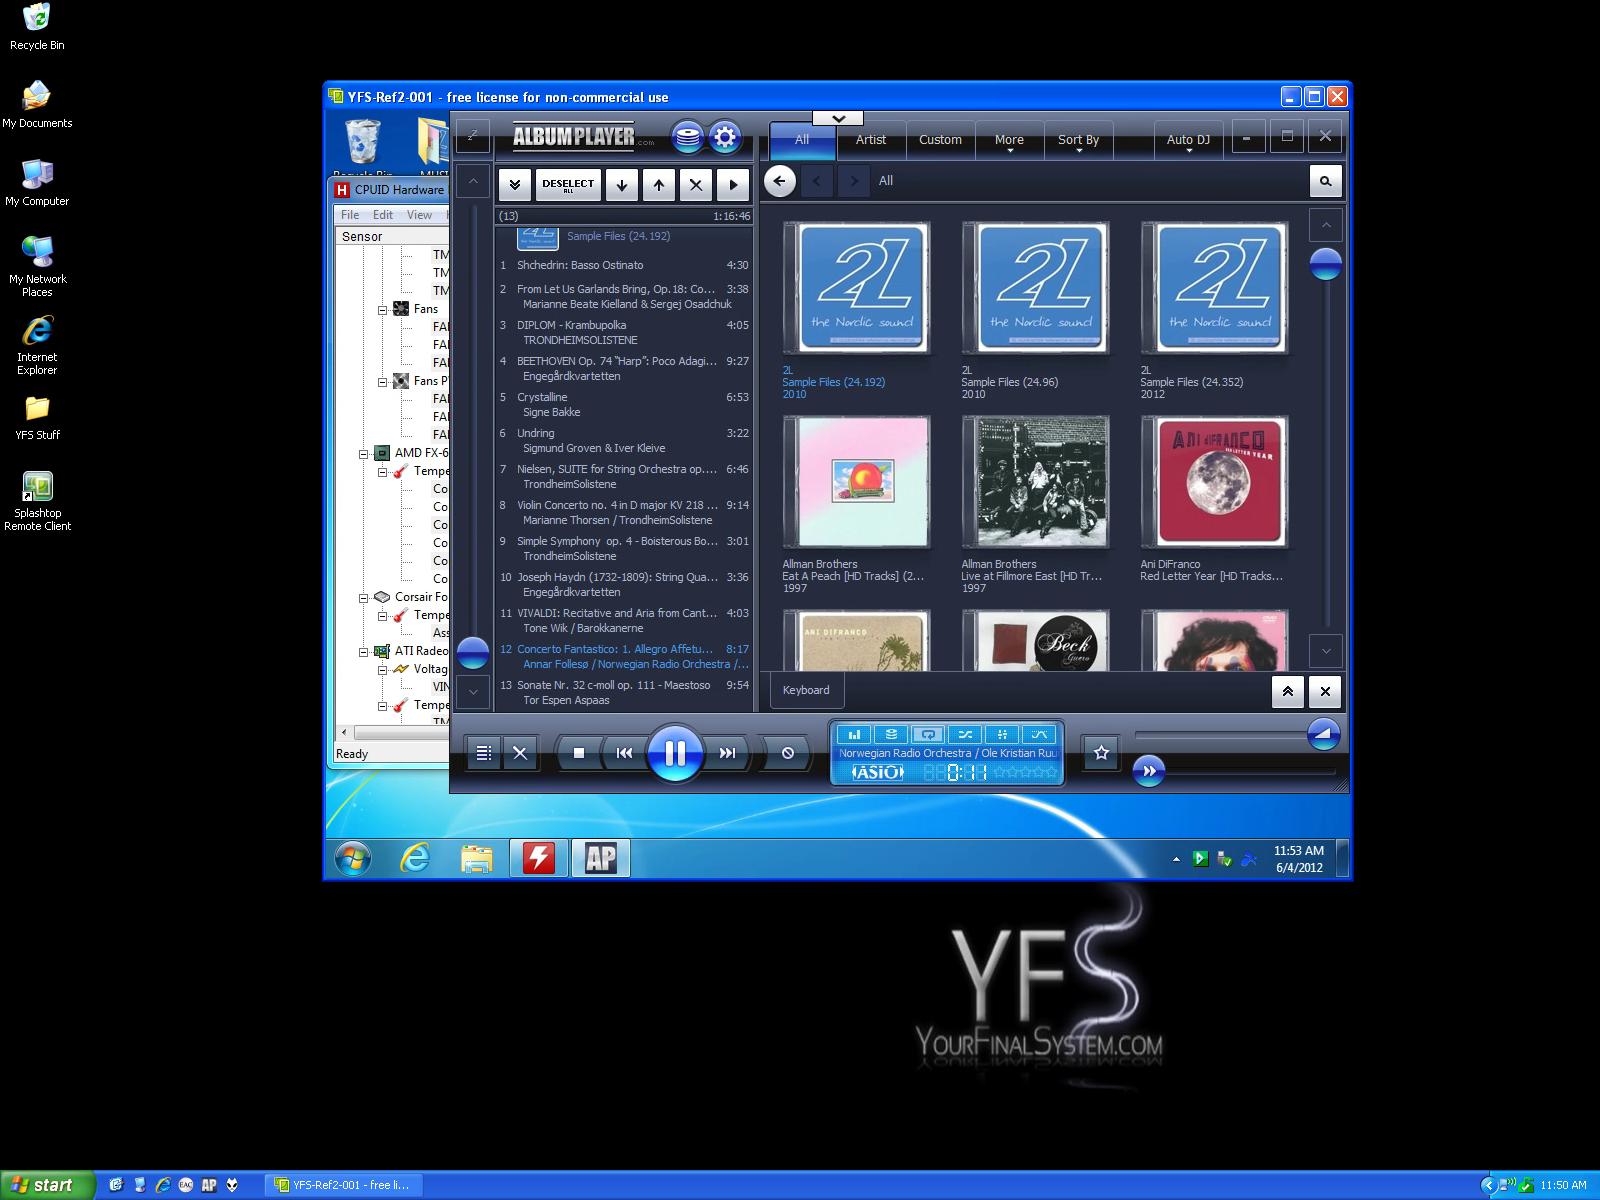
Now you click on the music server (YFS-Ref2-001) and you are taken directly into that server's desktop. Your personal server will have a different number than "001" but you get the idea. There's no need to enter IP addresses or anything like that. It's super basic and straight forward. See the remote server screen within the laptop screen in our screen shot below.


Notice you can make the remote desktop a small window or you can fill your screen by using the buttons at the very top of the remote window below:


The "X" in the controls window closes the remote app and the other buttons allow you to fill the entire screen, use different mouse commands, etc. It's all pretty straight forward.
 
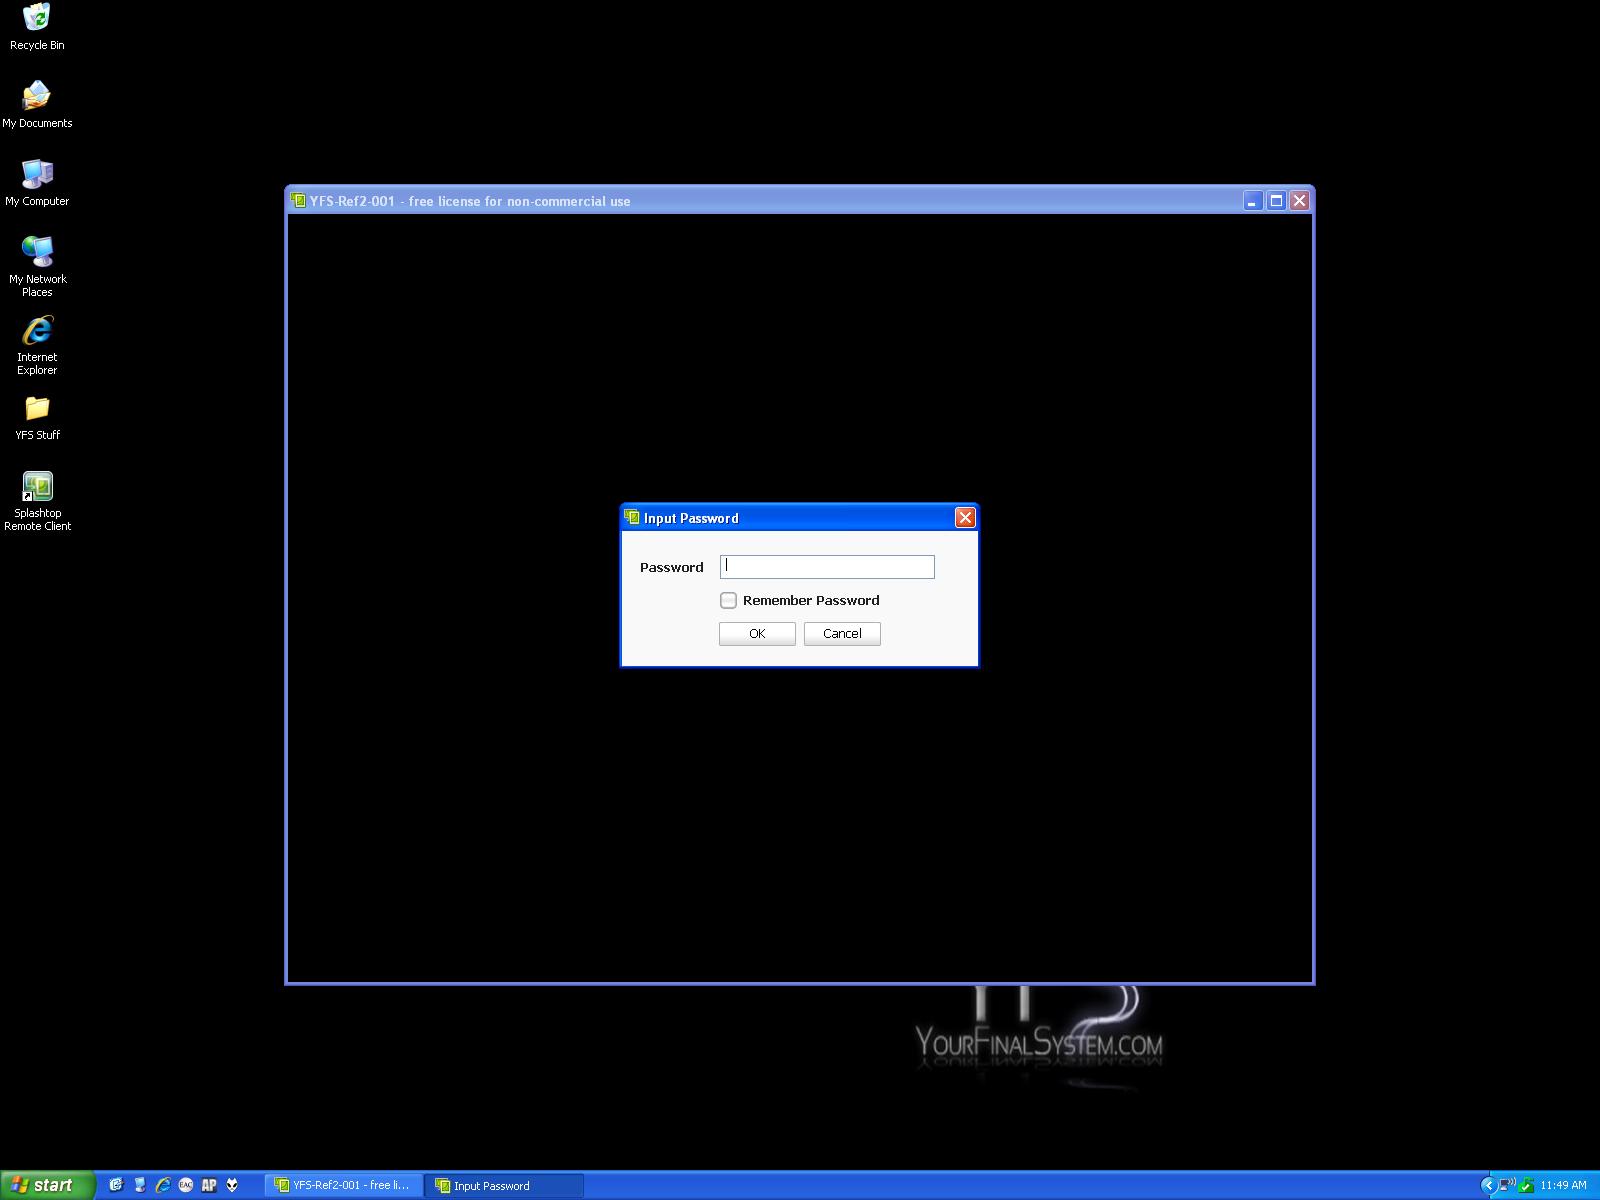
The next shot is where you input your password ONLY ONCE the first time you connect remotely. You can check the box to remember your password which is what we recommend so you can start playing music ASAP after turning
on the Ref-2. This process is only done ONCE the first time you login. After that, you won't see this screen which is why I showed it last.


So, that was 3 extra clicks beyond just clicking on your Album Player icon on your desktop and there are no IP addresses or any information you need to input to get going. (Your password is entered once during your very first login and that's it!)
 
We wanted to show our readers how easy it truly is to login remotely to a YFS music server. If there are any more questions just drop us a line. We're always here to help!!!
 
Thanks for reading.
 
 -KOB
 

by Kevin OBrien on June 4, 2012

 HOW DO I ADD/ DELETE/ MODIFY ALBUMS WITHIN ALBUM PLAYER?                                                                                                                                                                         
We decided to throw up a little tutorial on how to modify albums within our favorite computer audio playback software suite, Album Player. Adding albums, deleting albums, as well as modifying existing albums within the Album Player database can be a little tricky. Let's try to get to the bottom of all of it with some screen shots and explanations. Here we go!


PROPER PREFERENCES SETUP:

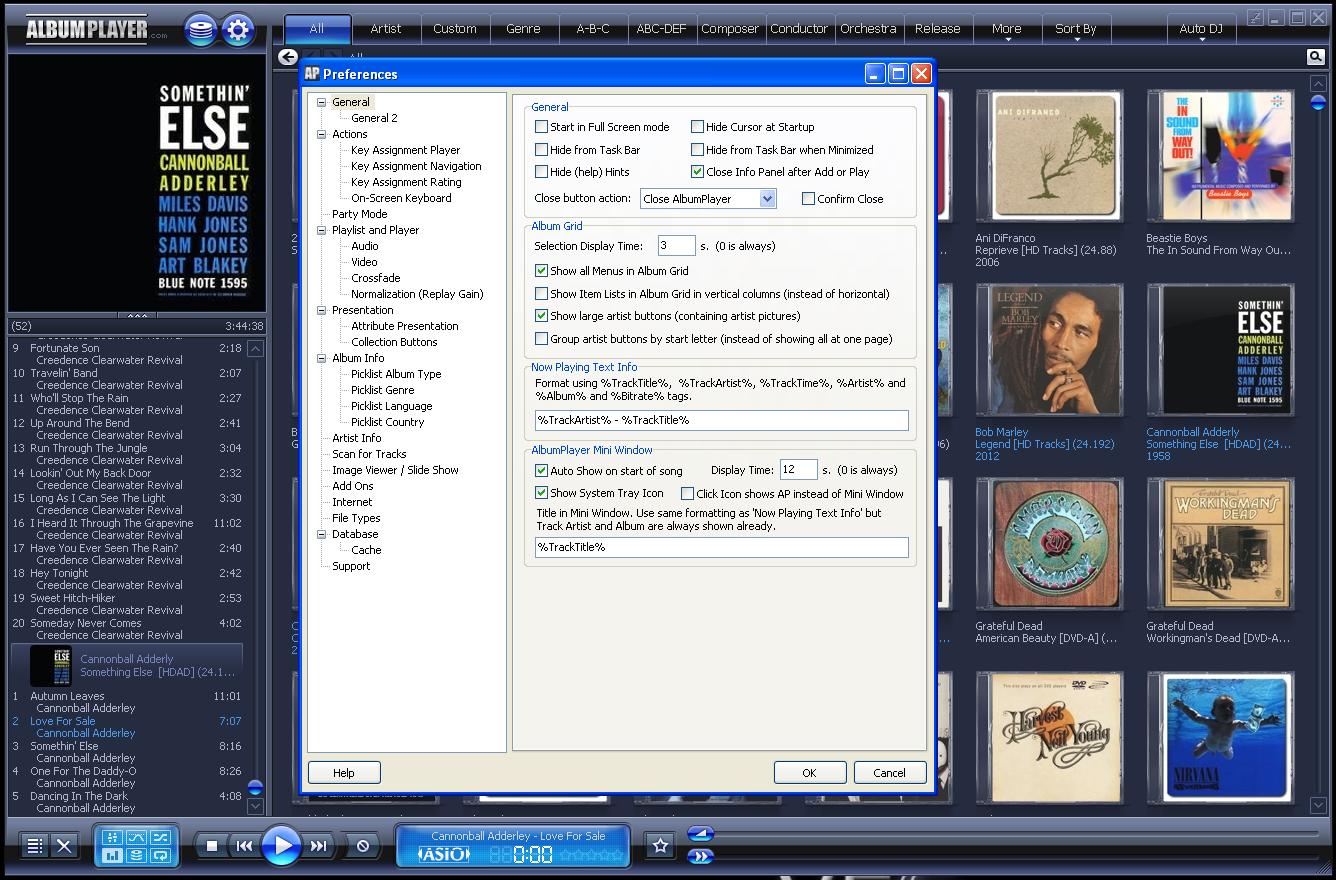
First, let's make sure the correct options are checked under the "Settings" menu before we get into how to add albums, etc.
 
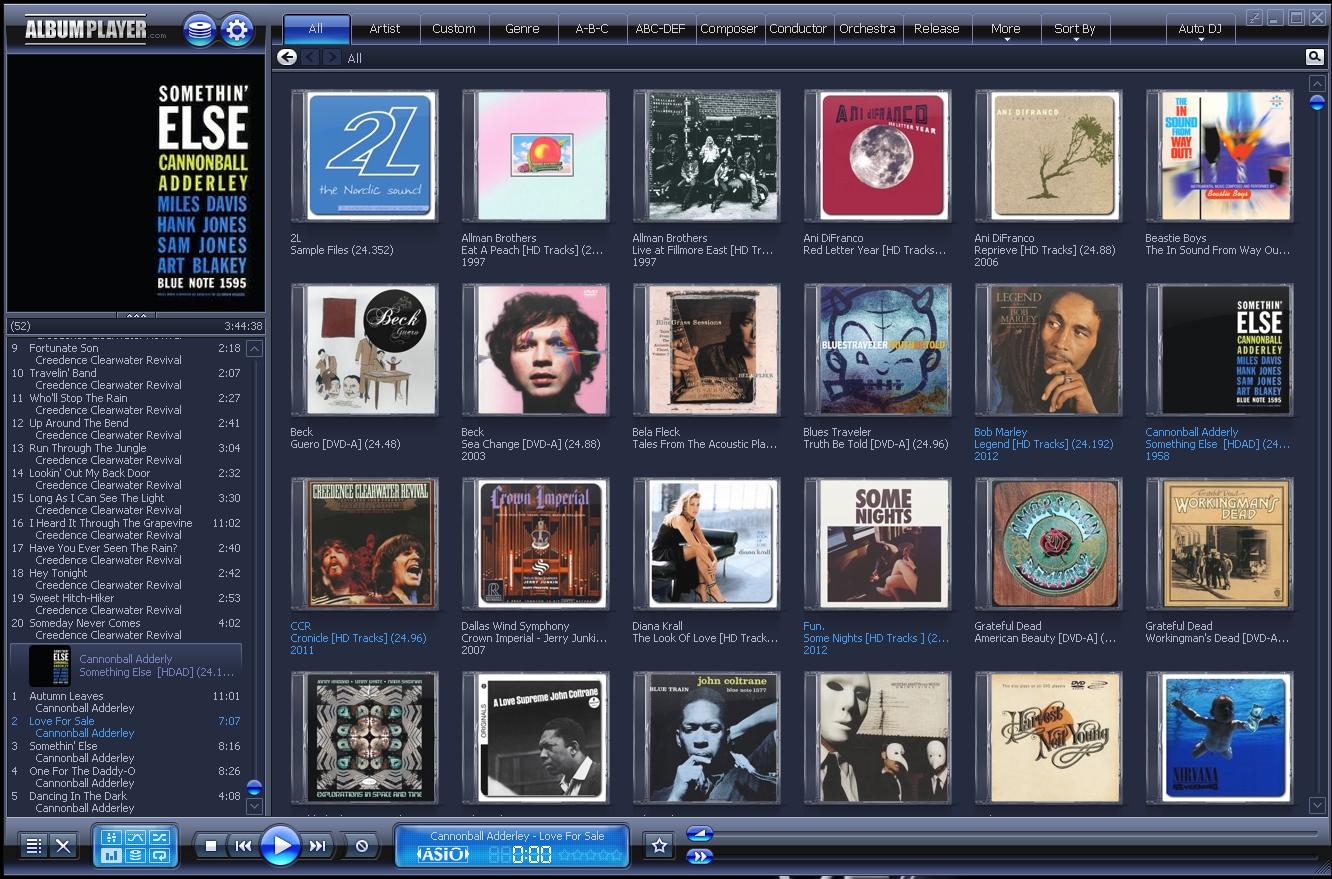
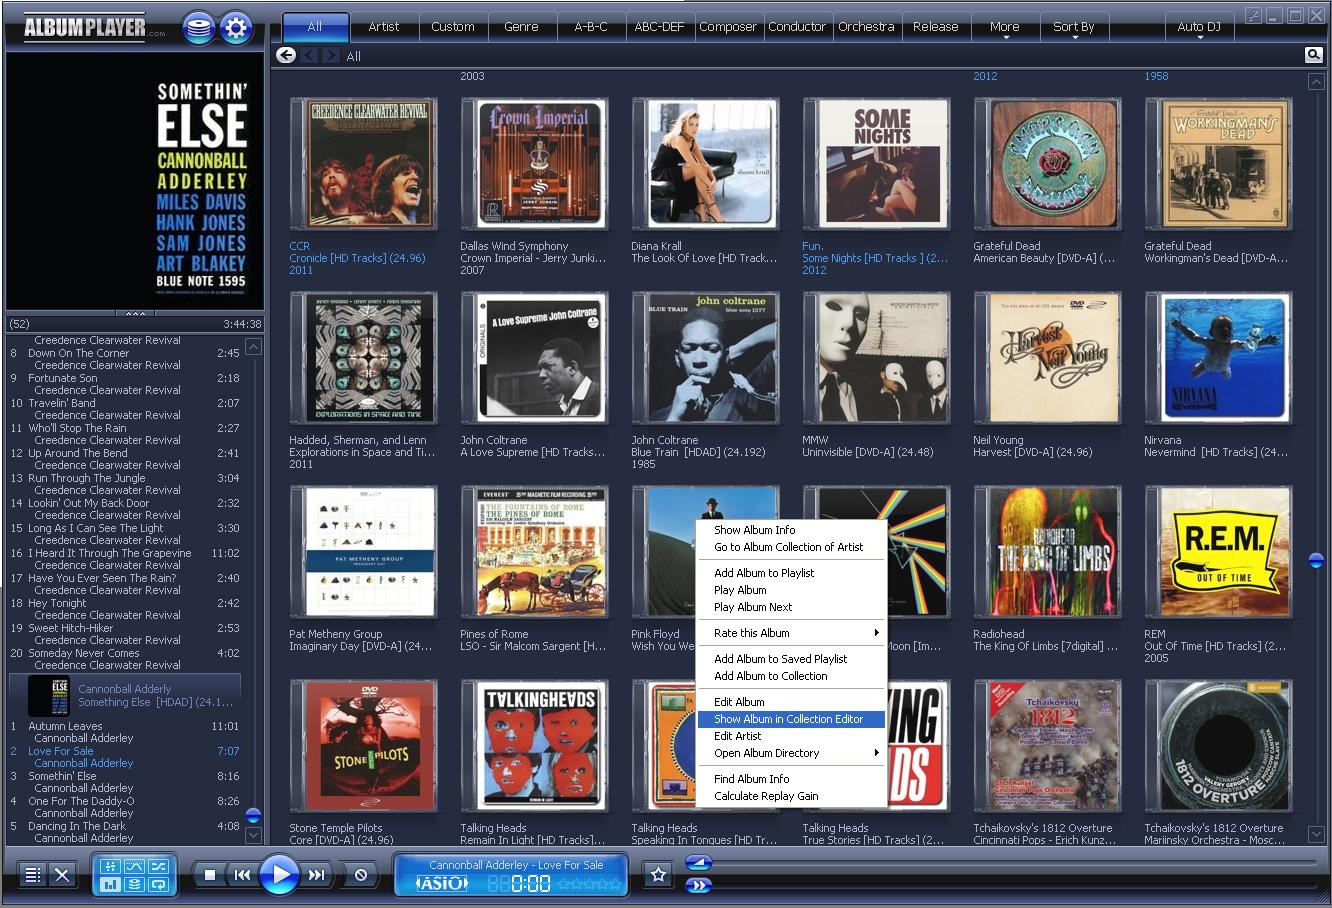
Hit the "Sprocket" or "Gear" button next to the "Stack of Discs" button. It's above the "N" in the "Somethin' Else" cover art in the screen shot below (upper left-hand corner of the window below).
 
 
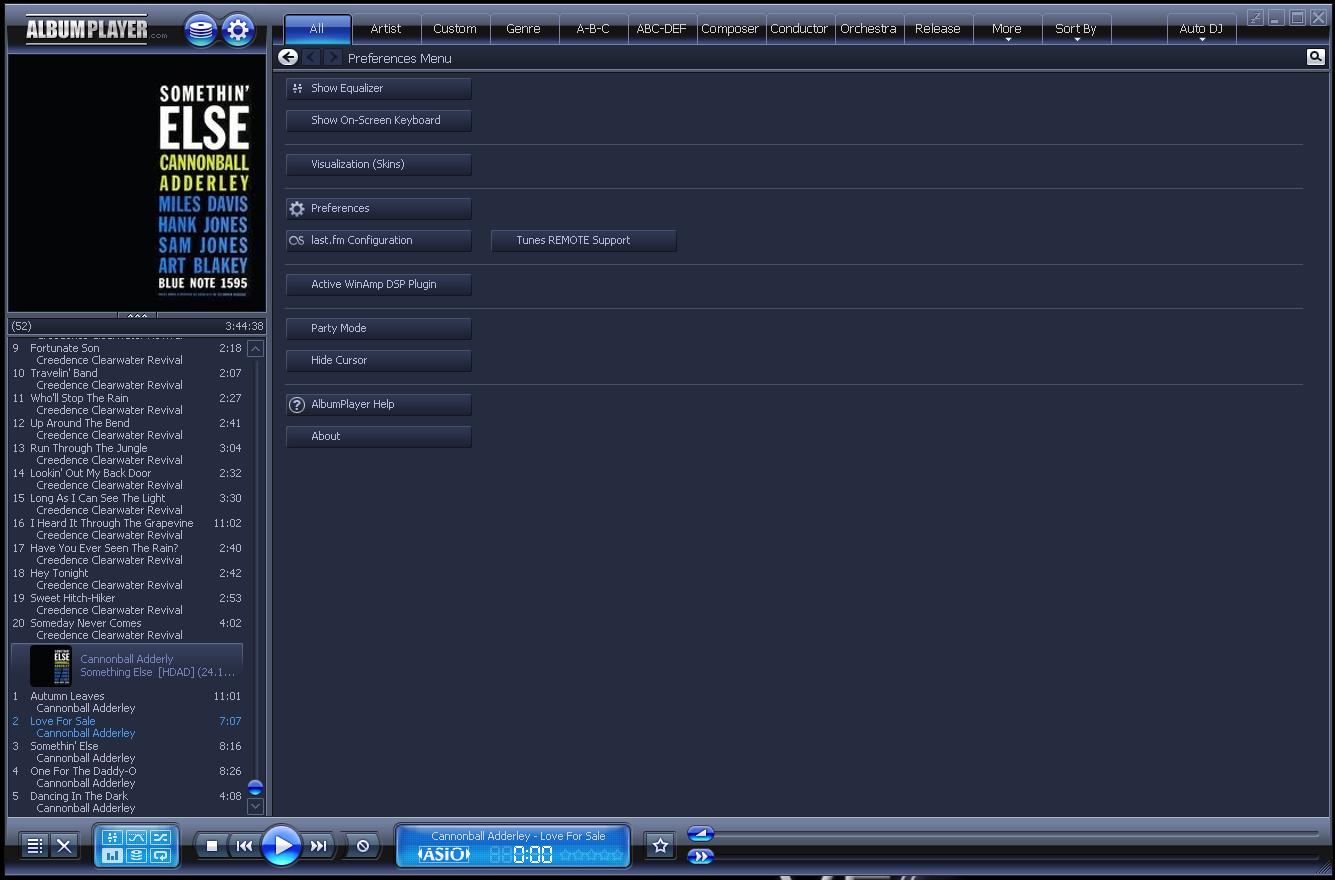
Now your "Preferences" options menu screen will appear as you can see below. You'll have to hit the "Preferences" button to get into the menus to change settings.
 
 
The "Preferences" menu is shown below.
 
 
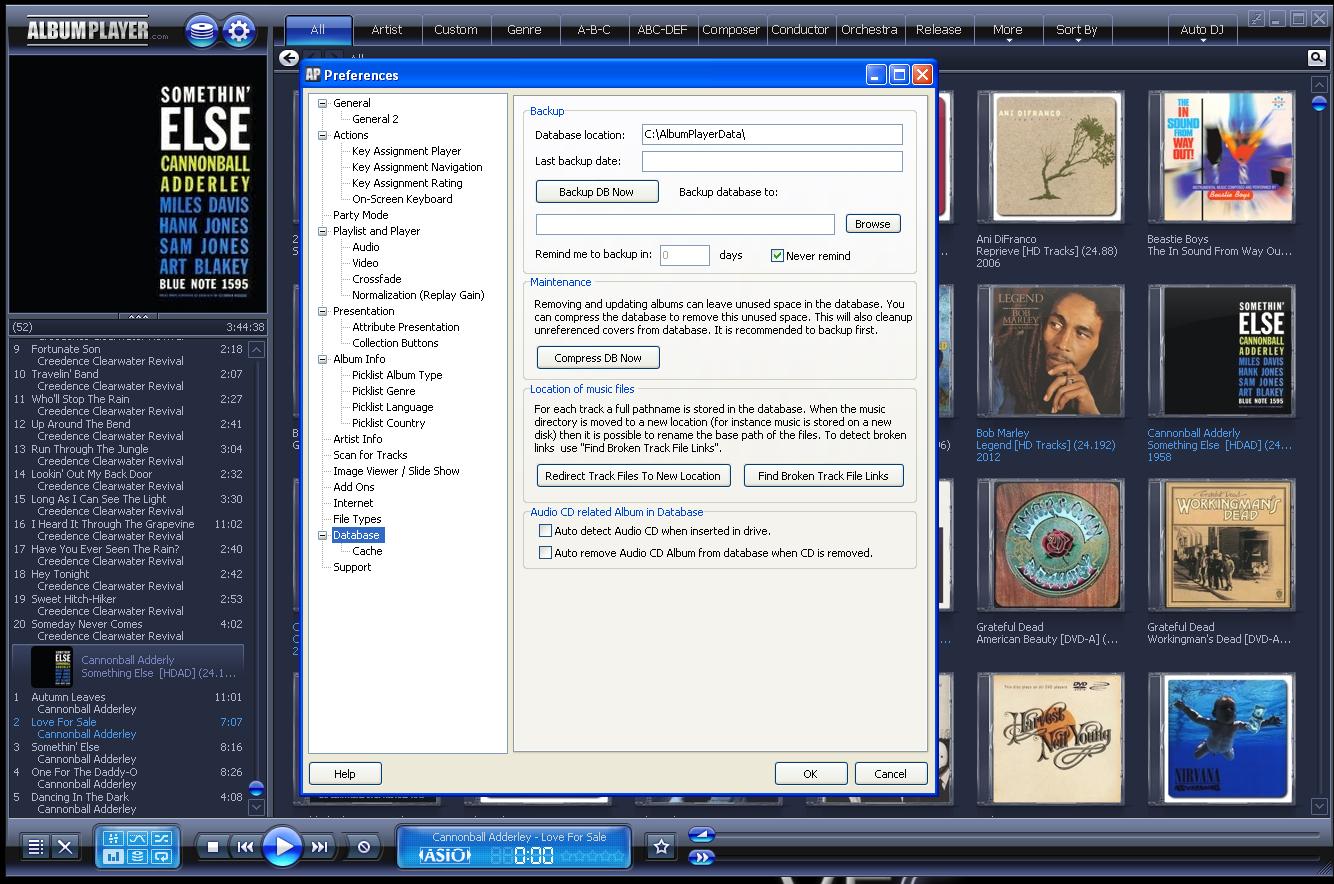
Highlight the "Database" heading under the "Preferences" menu as shown below.
 
 
Make sure to UNCHECK the two boxes at the very bottom of the menu screen above that say "Auto detect Audio CD when inserted in drive" as well as "Auto remove Audio CD from database when CD is removed from drive". This can cause some conflicts with EAC when trying to rip. If you prefer to use Foobar 2000 for ripping then you can leave the boxes checked.
 
NOTE: Check these options if you want Album Player to automatically recognize a CD when you pop it in the tray. You can then add the CD to your 'playlist' and now you're using one of the world's best sounding CD Transports!!! This feature is very handy when you want to listen to a disc without ripping it first. This especially holds true at audio shows, etc when demoing CD's is paramount!!!  :-)
 
You can browse through the rest of the options under the "Preferences" menu and experiment with the settings to personalize the program to your liking.


ADDING ALBUMS:

The next logical spot to begin would be the addition of new music to the AP suite. Album Player is kinda tricky to add and modify music. That's its only downfall in our opinion. You have to pop a disc into your server and then use a program like EAC to rip it to your hard disc in a location where you want your music to live. You can also choose to rip from another machine remotely and then bring in the files from an external hard drive onto your server for instance. This is how we choose to do it.

See our FAQ on ripping here!
 
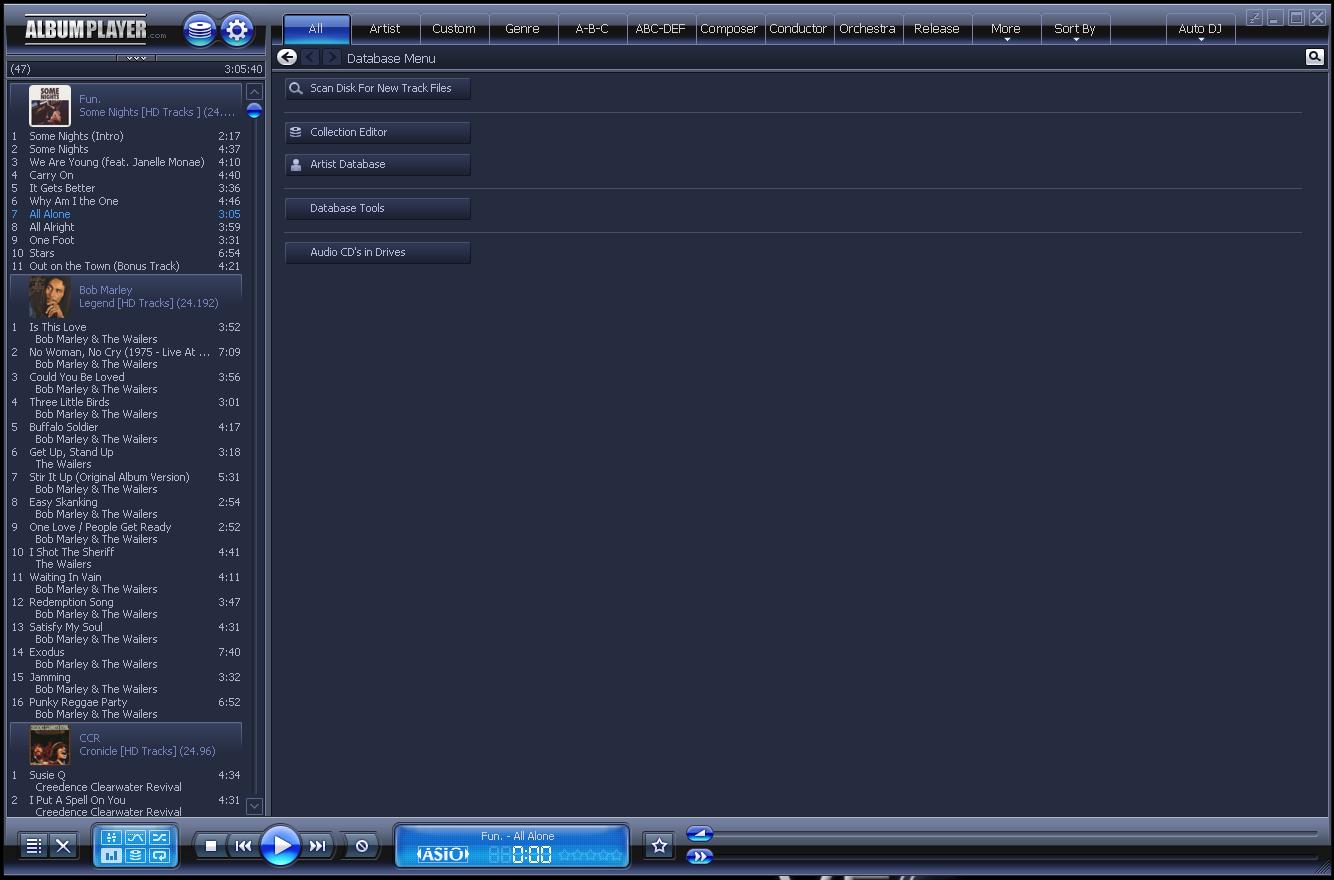
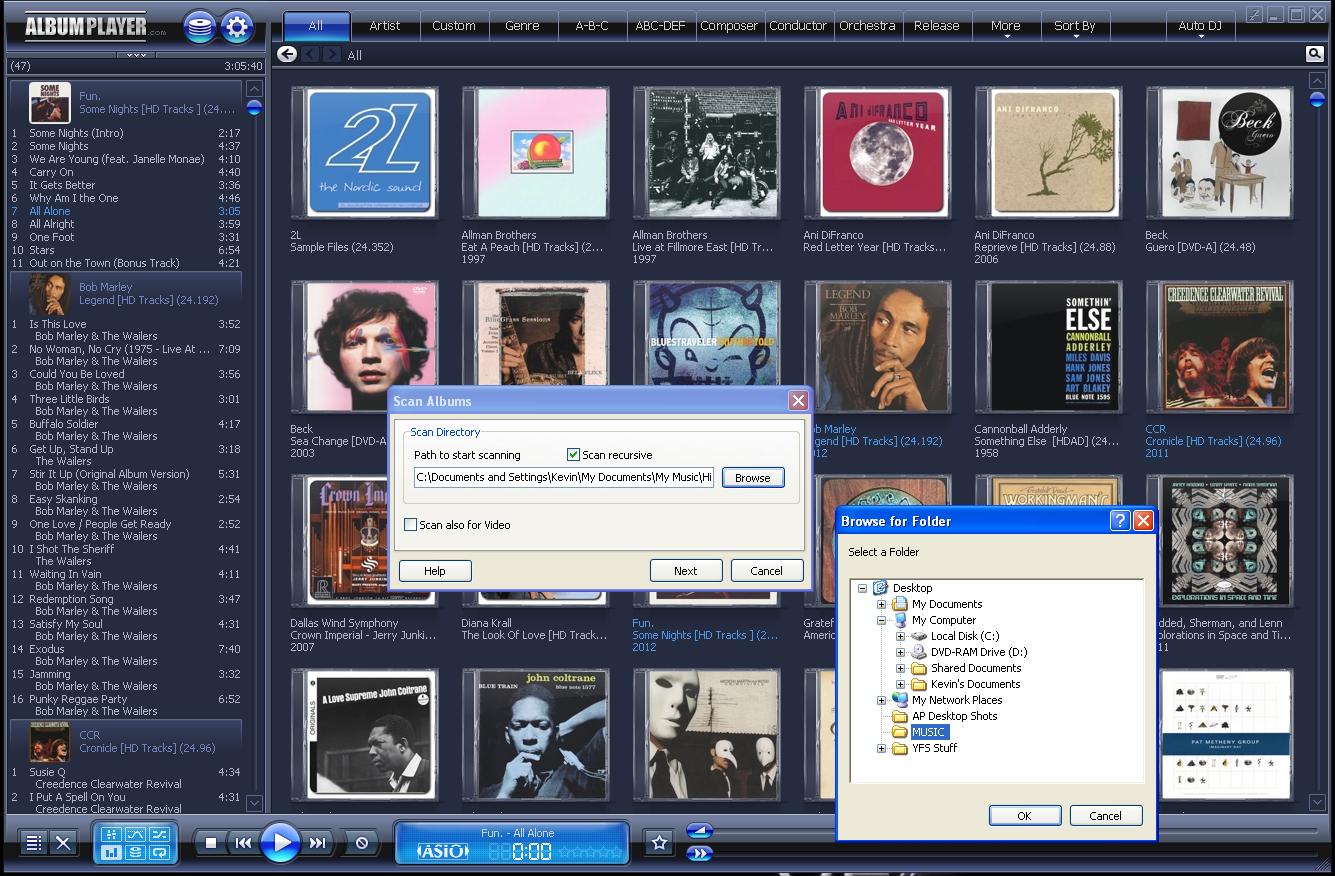
We personally place a folder on our desktop and label it "MUSIC". Then we use EAC to rip our discs to that folder. After you've ripped your discs, you must go into Album Player and hit the "stack of cd's" button near the top of the program window. In our case it's the button right above the first "E" in the Somethin' Else cover art below in the top left hand corner of the window.                                                                                                                                                                               

Now you have to point the program to the folder where your music lives that you labeled "MUSIC".
 
Hit the "Scan Disk For New Track Files" button shown below.
 
 
The "Scan Albums" window will pop up and then you have to hit the "Browse" button to point AP to your "MUSIC" folder on your desktop.
 
 
Every time you add a disc you have to point AP towards the folder you placed it in. The same goes for albums you download from HD tracks. Place them in the same folder on your desktop so all your music is in the same place for convenience. (At least that's how we like to do it)
 
Below is a shot of the window that pops up after you hit the "Browse" button and you've pointed AP to your music folders.                                                                                                                                                                                      
 
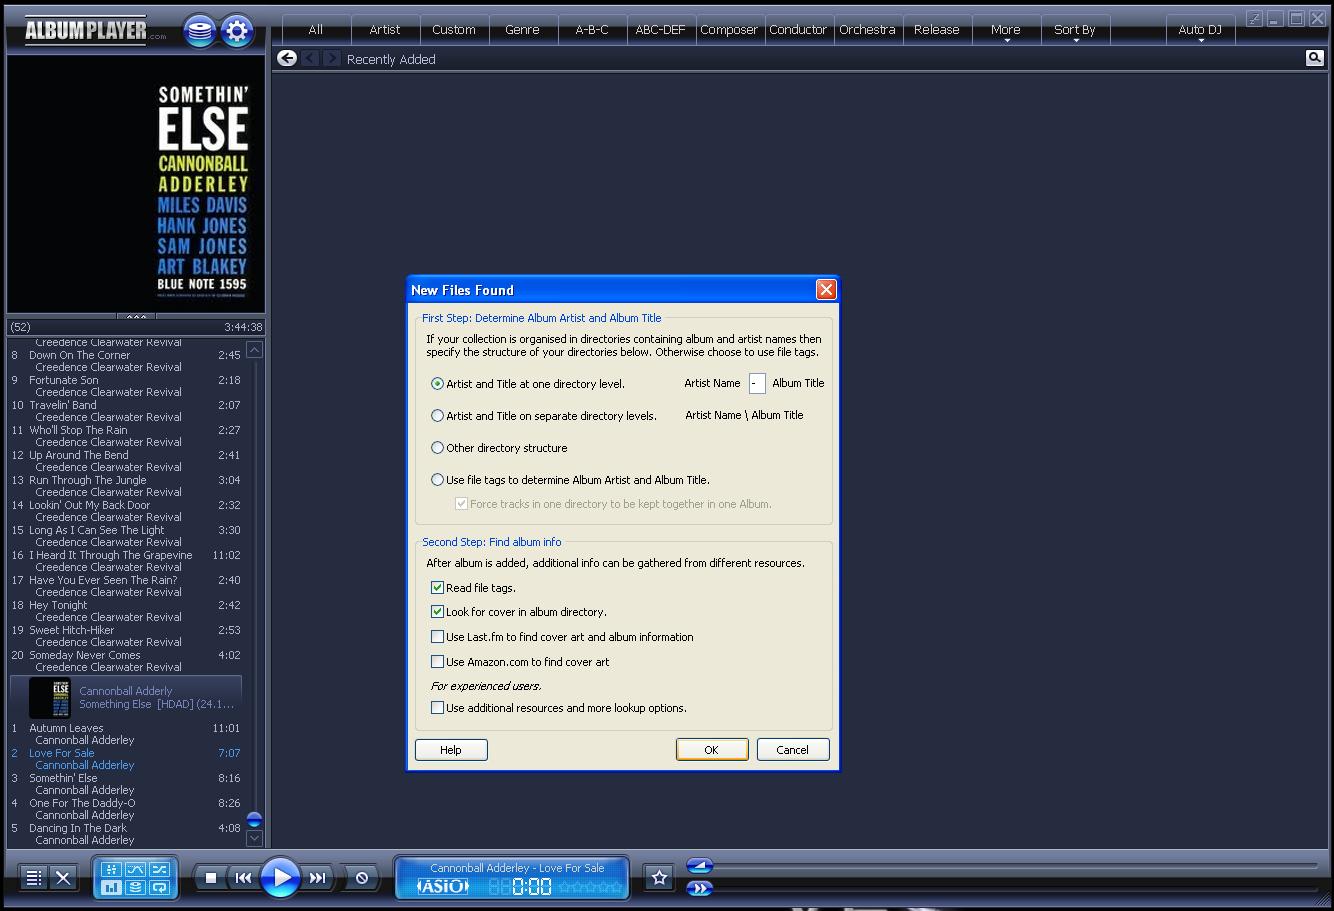
Once you point AP in the direction of your "MUSIC" folder, a "New Files Found" window pops up. Press "OK" to tell AP to start scanning your files.
 
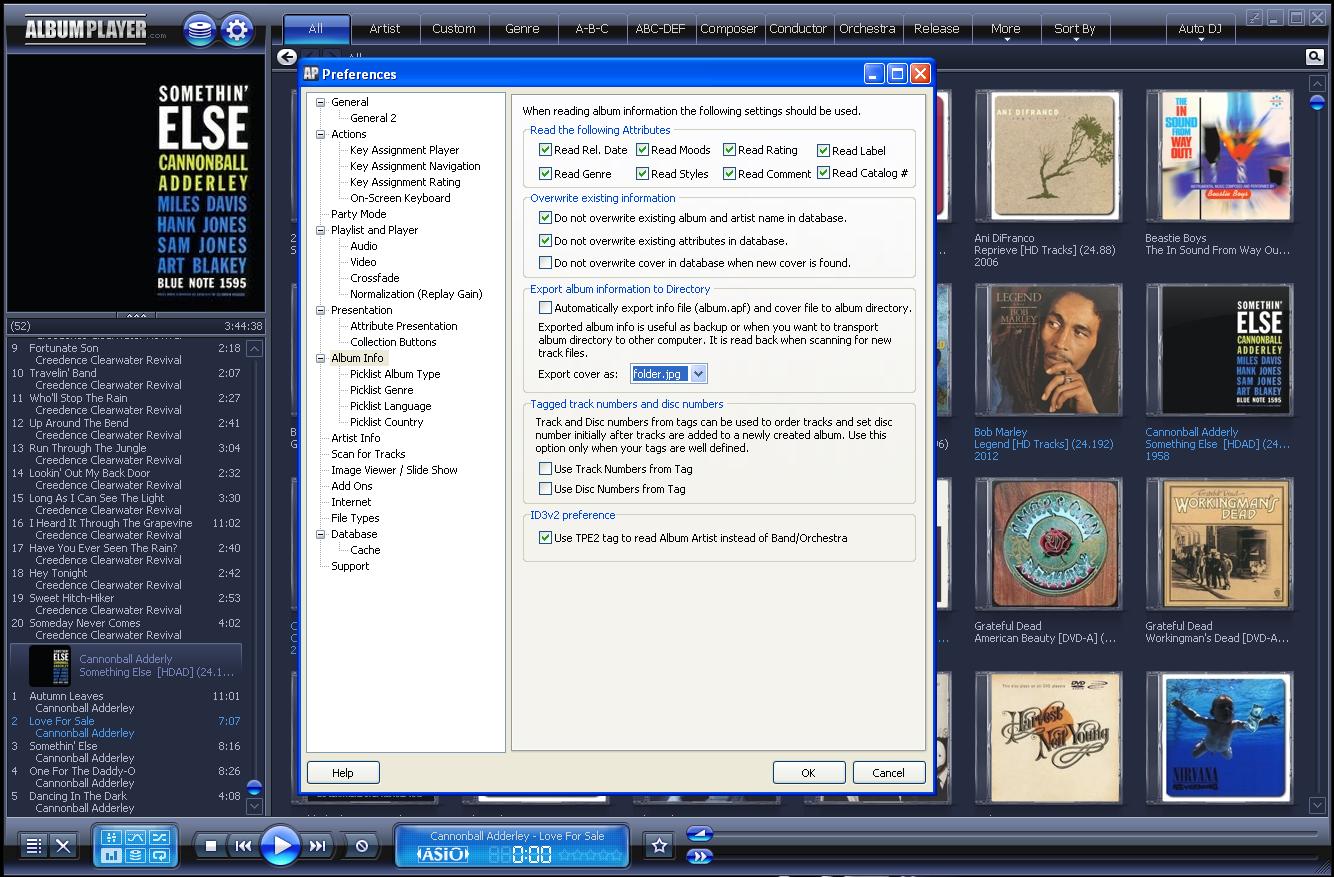
NOTE: Make sure to UNCHECK all the boxes under the heading "Second Step: Find album info" except for the top two options. Specifically, you should check "Read file tags" and "Look for cover in album directory". This way AP does not replace your personal cover art and track information you added to your music folders when ripping with EAC!!!  Also, make sure to play around with the settings under the "Preferences" menu under the "Album Info" heading below. If you do not check the boxes "Do not overwrite existing album and artist name in database" and "Do not overwrite existing attributes in database" and "Do not overwrite cover in database when new cover is found" AP will overwrite your tags/ album art you placed in your files folder when ripping in EAC!!! Another handy feature within AP is the option to add the 'album.apf' file to your music folders. This allows you to transfer music to several machines and keep your attributes the same so you don't have to edit each computer's music. Check the box "Automatically export info file (album.apf) and cover file to album directory" to accomplish this.
 
 
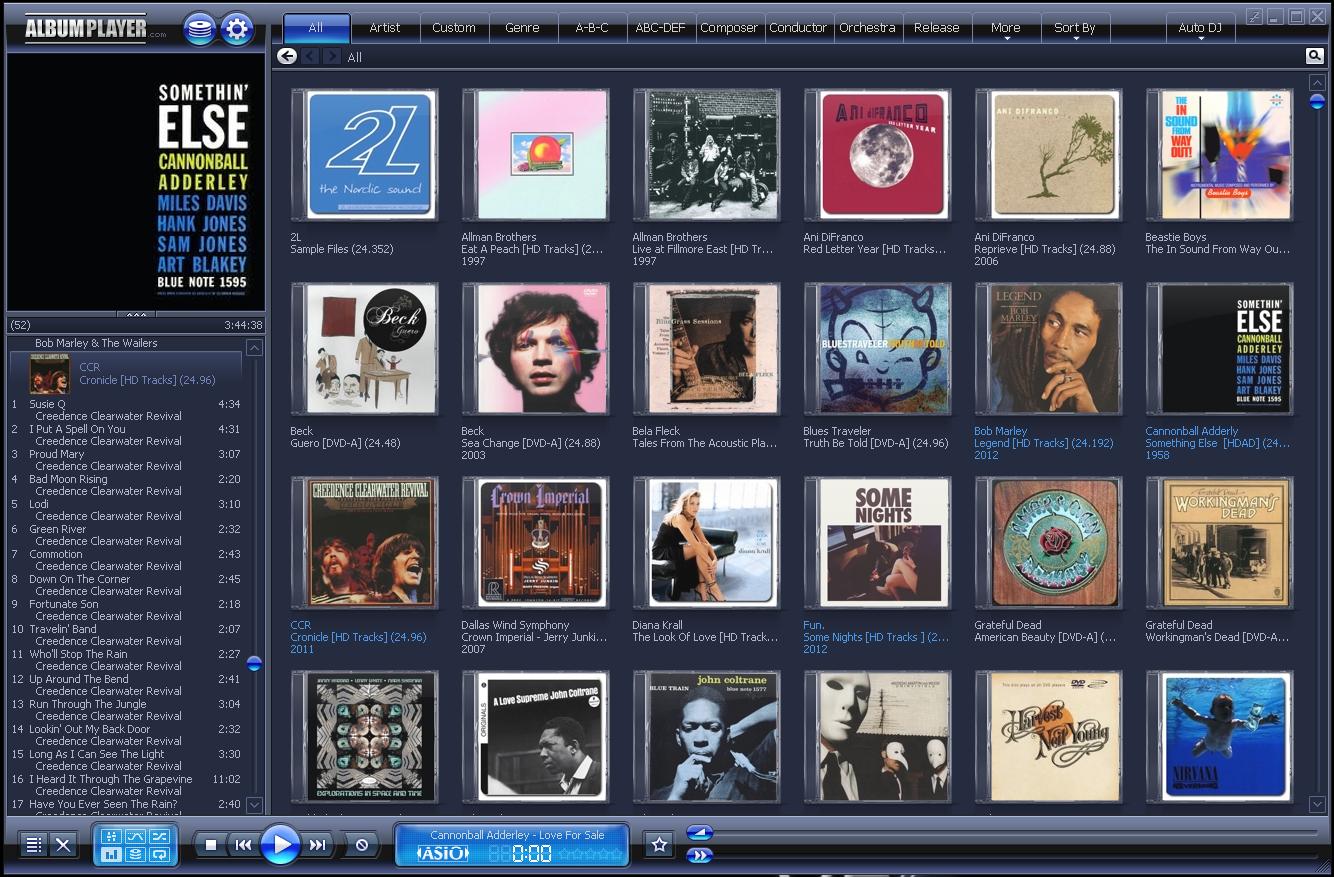
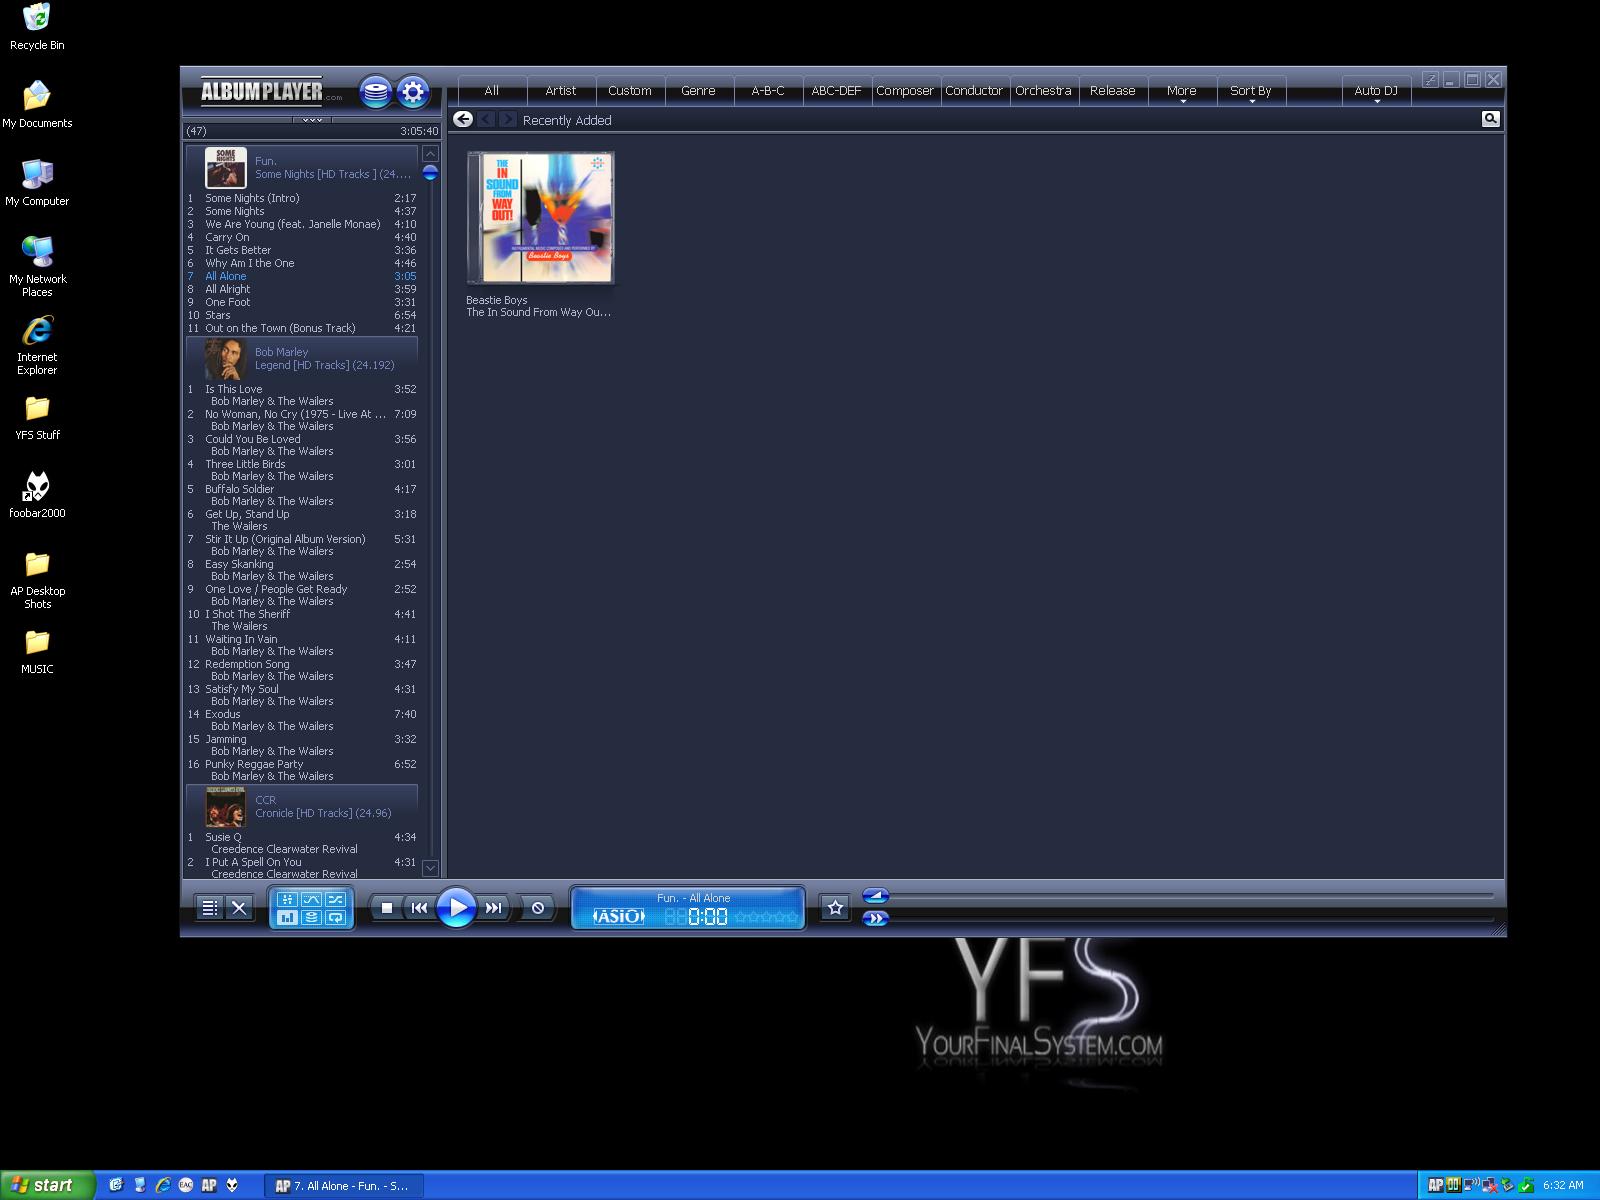
AP automatically shows you the recent files you just added. Click on the "ALL" tab at the top of the window below just above the recently added album. Now you can see your entire collection. You can point AP to your MUSIC folder and it will scan all your music but it will add duplicate albums if you don't point it to the exact albums you rip every time you want to add another album. That's another feature we wish was different. Such is life!
 
 
It's a little tricky at first but you'll get the hang of it. Deleting albums from AP is just as tricky. The cool thing is, it won't delete any music from your hard drive, just from its own program database.


DELETING ALBUMS:
 
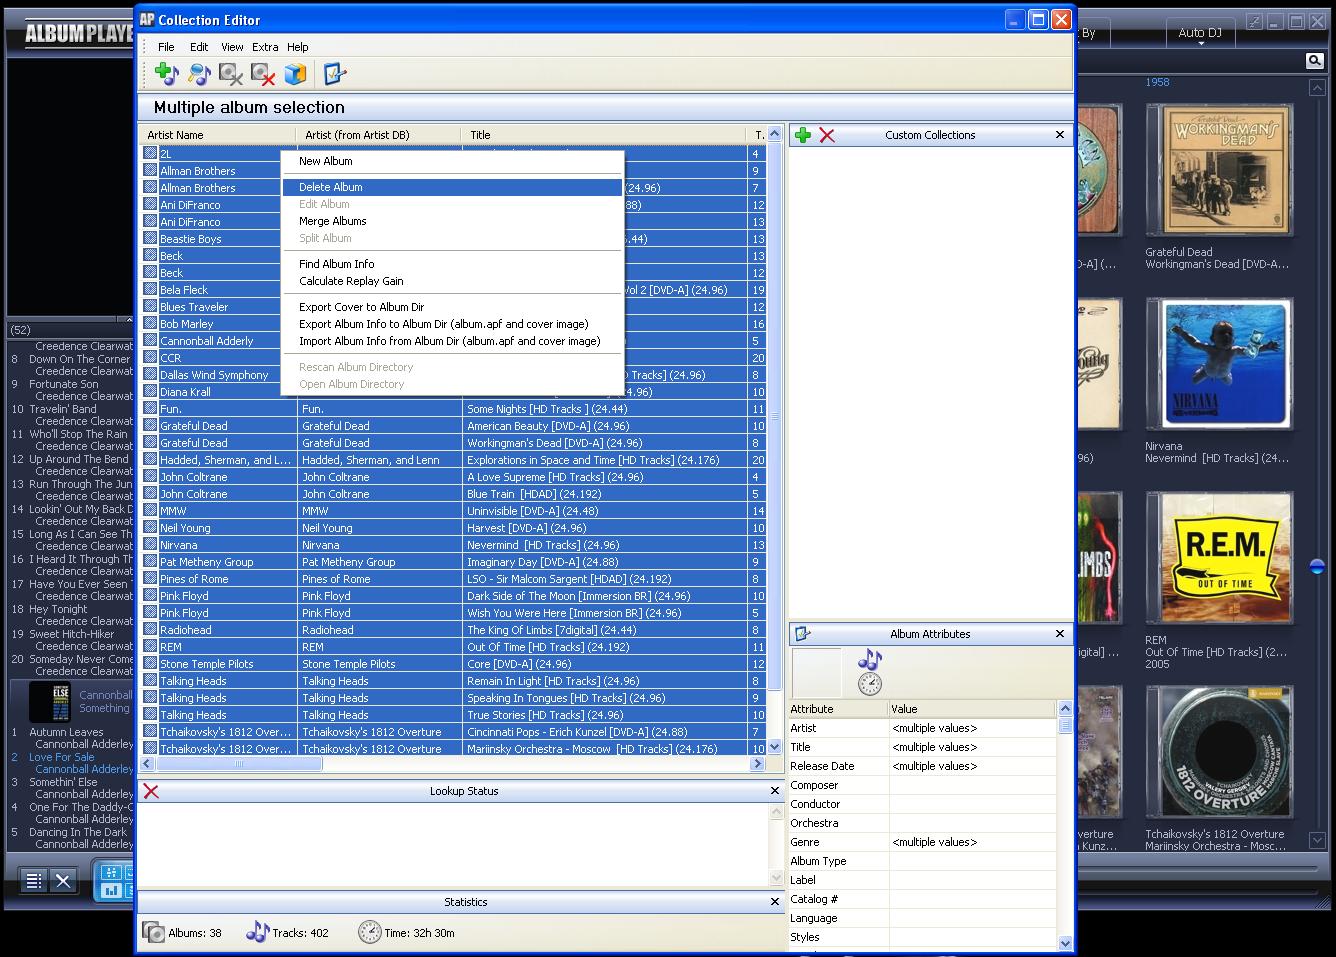
To delete albums within AP, you'll have to access the "Collection Editor". Right-click on an album within AP to get the "Collection Editor" window to pop up. See the screen shot below.
 

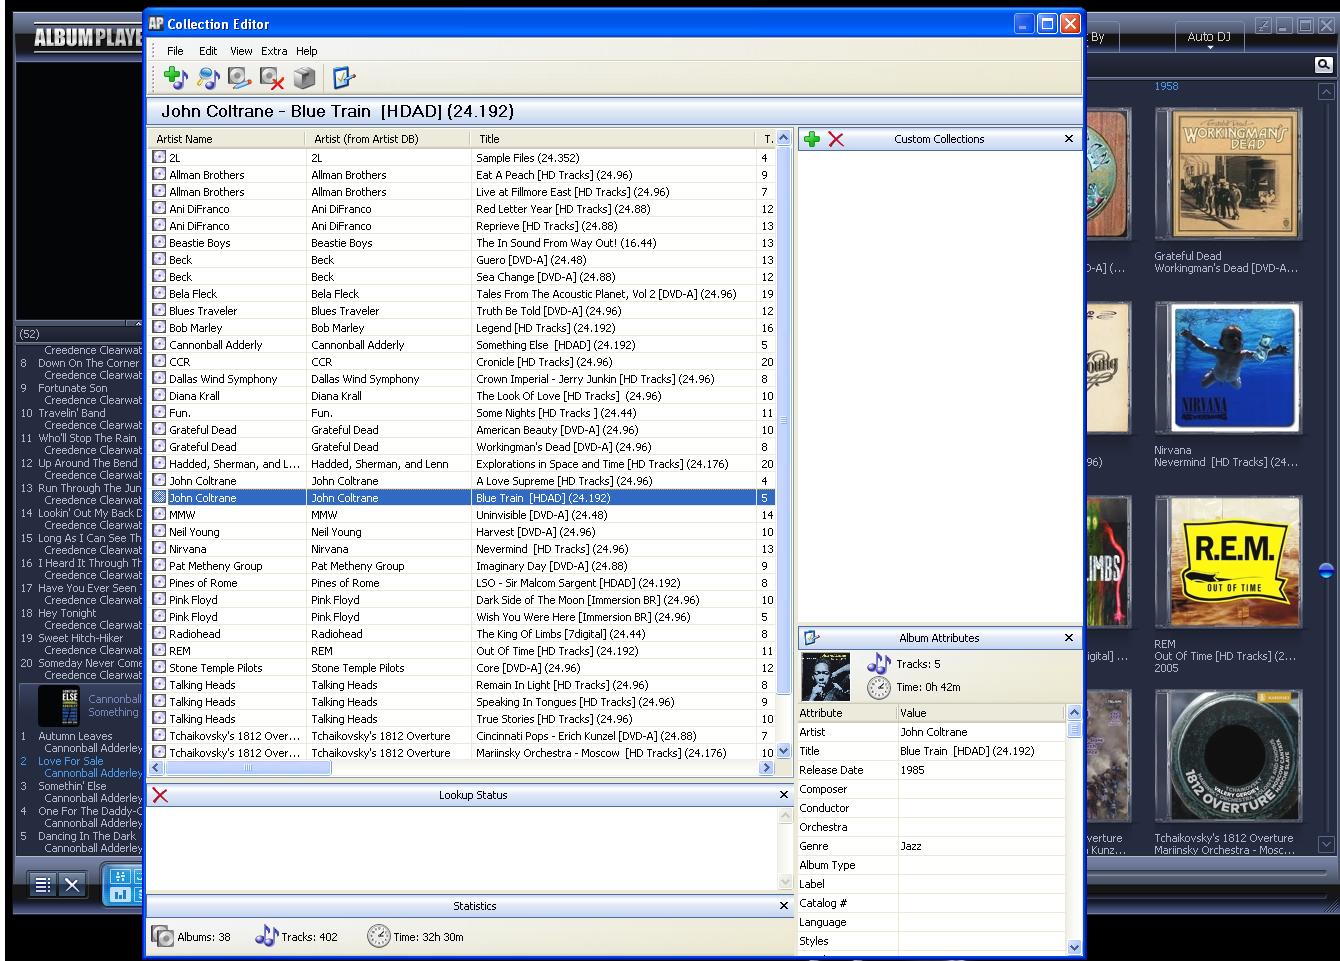
Now you need to manipulate the albums you want to from the "Collection Editor" window as shown below.
 

I chose to highlight a single album to delete. Right click on the album you'd like to get rid of and then click "Delete". That should remove it from the AP database. This is very handy when you accidentally add duplicate albums or you prefer to add albums in batches. You can go into the "Collection Editor" and select the duplicate albums and just delete them if that makes adding your music faster. It's all personal preference.
 
You can obviously delete your entire collection by clicking on your last album, holding down the "SHIFT" key, and then clicking on the first album to highlight them all. This is shown below. Remember, you are only altering your AP database, NOT THE FILES ON YOUR HARD DISC! This is very cool considering you will NEVER delete your original files you ripped or downloaded by editing them within AP.  We like this feature!
 
This method of deleting the entire collection is handy when you just want to add several albums you've ripped/ downloaded and you don't want any duplicates. Instead of pointing AP to the multiple albums you've added to your hard disc, you can delete them all and then just point AP to the entire folder your music lives in. This will allow you to add music VERY quickly in two steps instead of multiple steps.


MODIFYING ALBUMS/ EDITING ALBUM ATTRIBUTES:
 
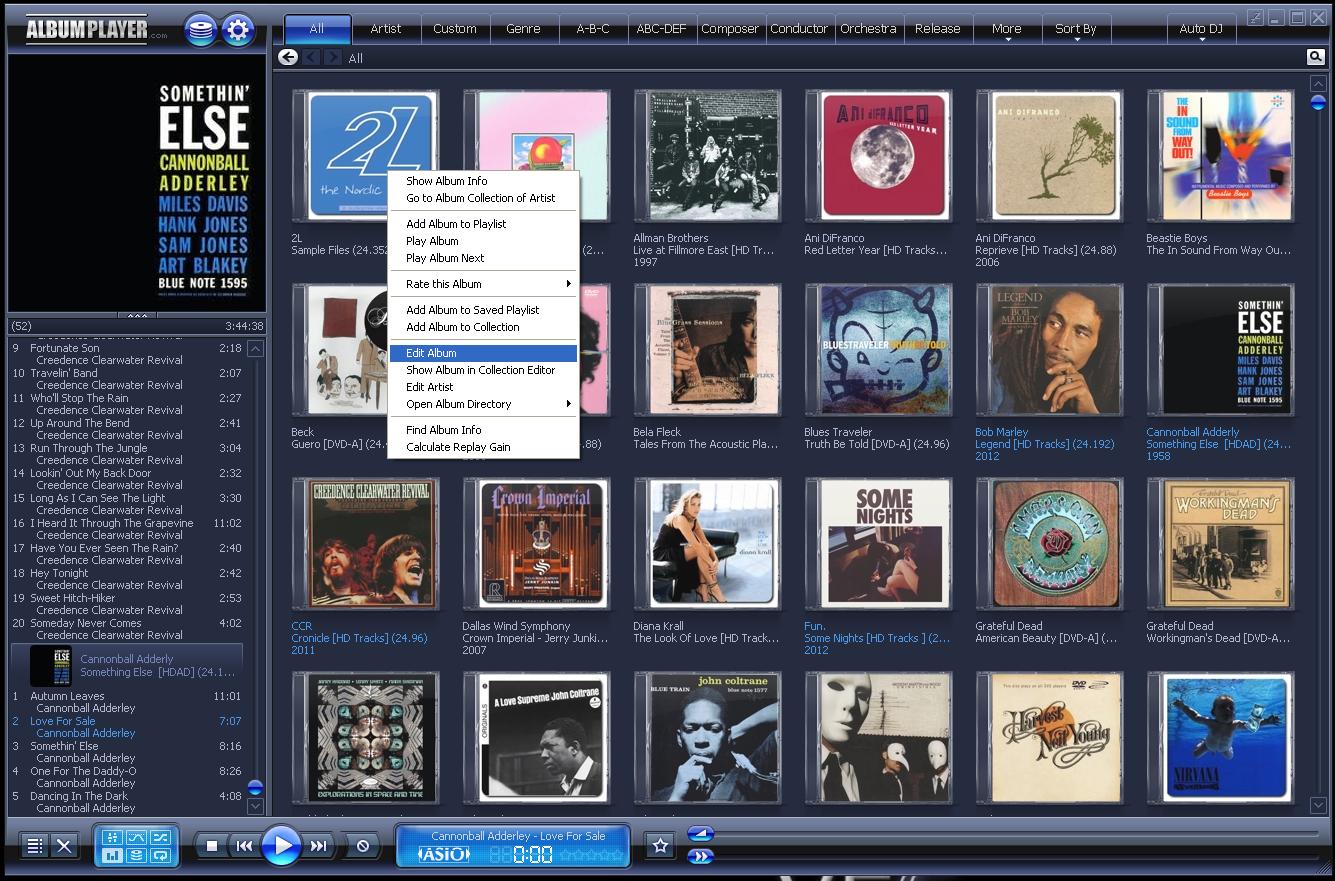
In this final section of our AP FAQ, we show the user how to edit album art, track information, as well as album titles and artist information. In order to edit your albums within AP you'll need to right-click on the album you specifically want to edit. See the screen shot below.
 
 
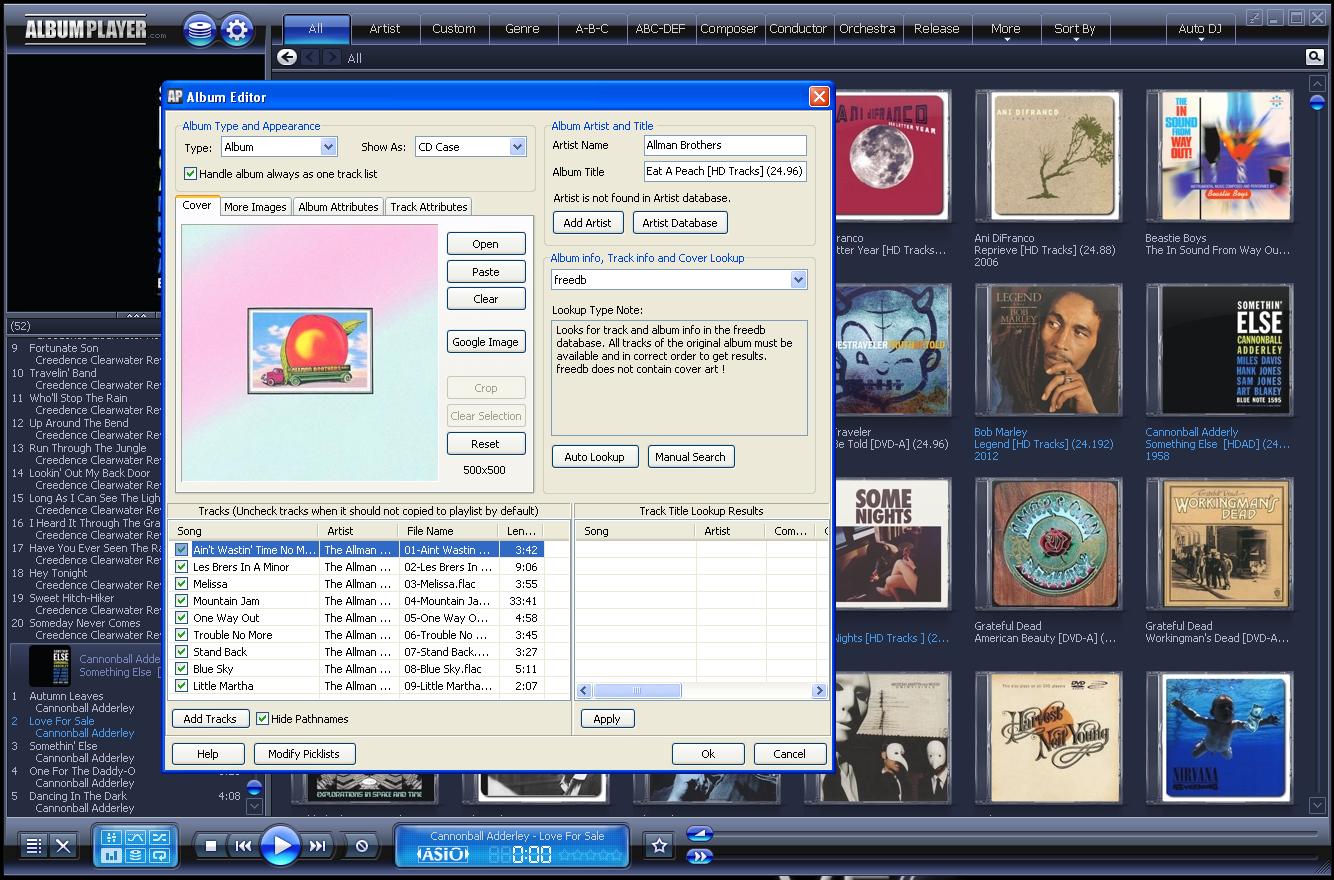
Now you're going to need to go into the album attributes menu where you can edit track names as well as the album art and other album attributes such as the album name and artist. We like to just use the track name for each track instead of the entire name EAC provides after each rip. You can set up EAC to use just the album track name and omit the artist and album info. This is HIGHLY recommended!!! See below for a screen shot of the album attributes menu window. You need to hit the "Google Image" button and that will take you to the Google Images web page. You can search for your cover art if you'd like to modify or change what AP came up with after scanning your files.
 
 
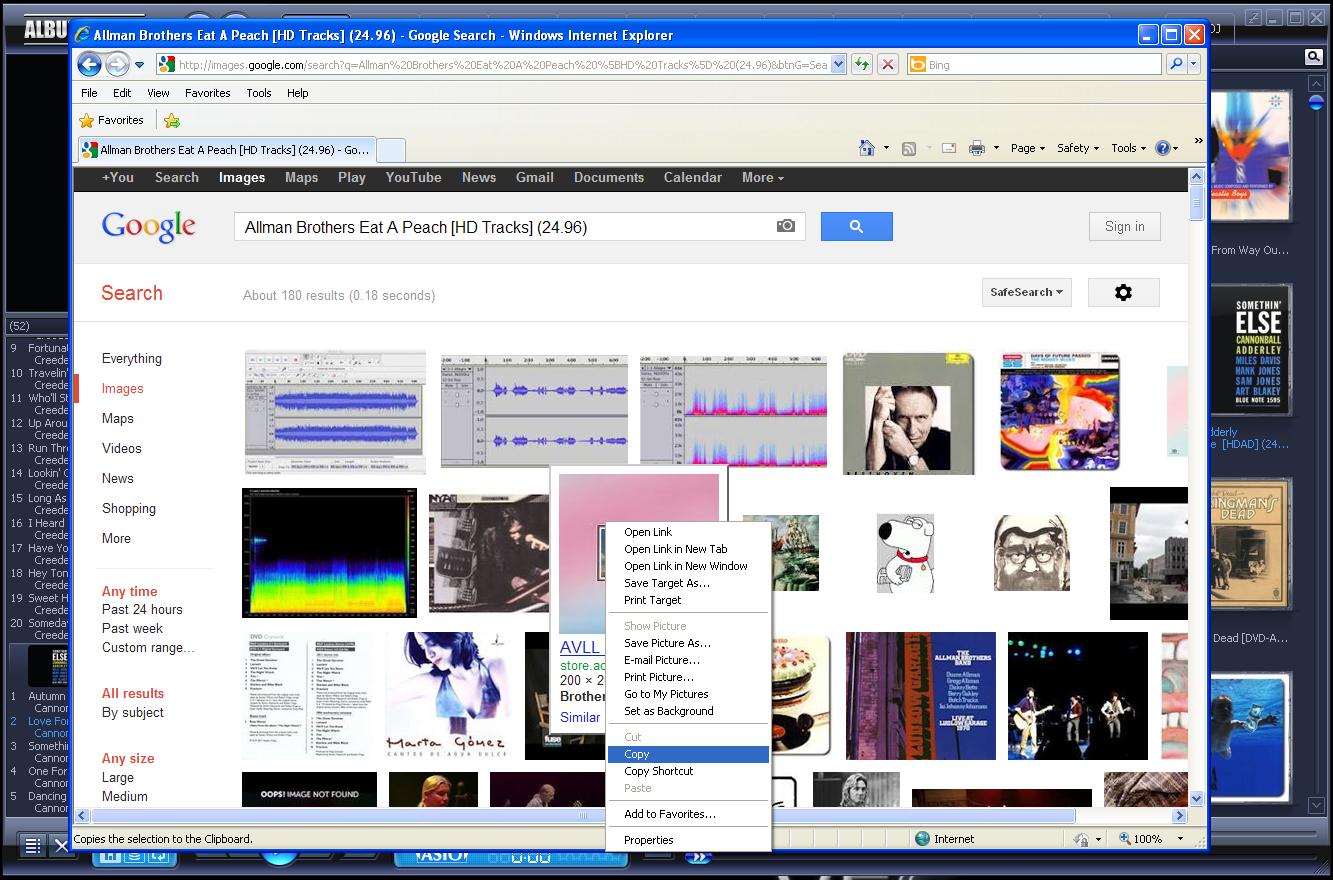
You may have to re-enter the search term at the very top of the Google Images page. This way you can find the correct album art. You may have to play around with search terms until you find your correct art. Once you have found the correct album cover on the Google Images page, right-click on the cover art picture and hit "COPY".
 
 
Go back to the album attributes window and hit the "Paste" button next to the album cover. This will add the album art you just copied in the Google Images web page. PRETTY SLICK!  If you already downloaded album cover art from EAC and you know it's in your album folder already, you can hit the "Open" button above the "Paste" button and you can select the cover art that is already contained in the album folder on your hard drive. I wanted to show the user how to find cover art if they didn't download it while they were ripping. It's easier to just hit the "Open" button and point AP to the cover art within your folder. This is what you would do if you downloaded an album from HD Tracks and it didn't show up correctly.
 
 
Remember the album attributes window above is where you need to change ALL the album info you see in AP. There's no other place to do this. You can click on the track names and the tag editor comes up where the album art is located in the pic above. The top right-hand corner of the album attributes window is where you would change the name of the artist and album to read exactly what you want within AP. You can also modify how the album 'appears' in your playlist. The default setup shows a CD case around your album artwork. We change the border to look like a vinyl album cover when we have needle-drops in our collection. This is accomplished by changing the "Show as" menu above the album cover in the screen shot above. There are several options to choose from. You should be able to get the hang of all this after a little while. With more and more practice it will become easier to navigate through AP's menus.
 
THANKS for reading and we hope this tutorial helps our users navigate through the AP waters a little easier.
 
Until next time...
 
 -KOB
 

by Kevin OBrien on 03/09/2012

 HOW DO I RIP CD AND DVD-A TO LOSSLESS FORMAT?

I decided to write an F.A.Q. on how to rip one's CD collection. I will briefly touch on DVD-Audio ripping into Hi-Res files as well. Unfortunately, I have not figured out how to rip SACD's. The one exception is the CD layer within Hybrid SACD's. This is the same process as ripping a CD. Although not all SACDs are of the Hybrid variety.

I prefer to use EAC for CD ripping. I've heard around the campfire that Foobar 2000 has a ripping suite that bests any other program as far as sound quality is concerned. I will touch on that after I describe the CD ripping process within EAC.

EAC is very easy to use, it's FREE, and it does a GREAT job of ripping CDs. Where it really shines is ripping dirty or scratched CDs. It may take several hours but it should be able to rip them accurately. It won't rip EVERY scratched CD, but should rip most of them if they're not scratched too badly. This is the MAIN reason I use EAC over any other CD ripping suite!

Install the program by executing the install file after downloading here. Once the program is installed, place a CD into your CD Rom drive. EAC will ask you if you want to perform a test on your CD Rom drive. You can let it test your drive or use the documented settings. I always let EAC test my drive for the most accurate results. Below I've attached a screenshot of the EAC menu where we must begin with our set-up.
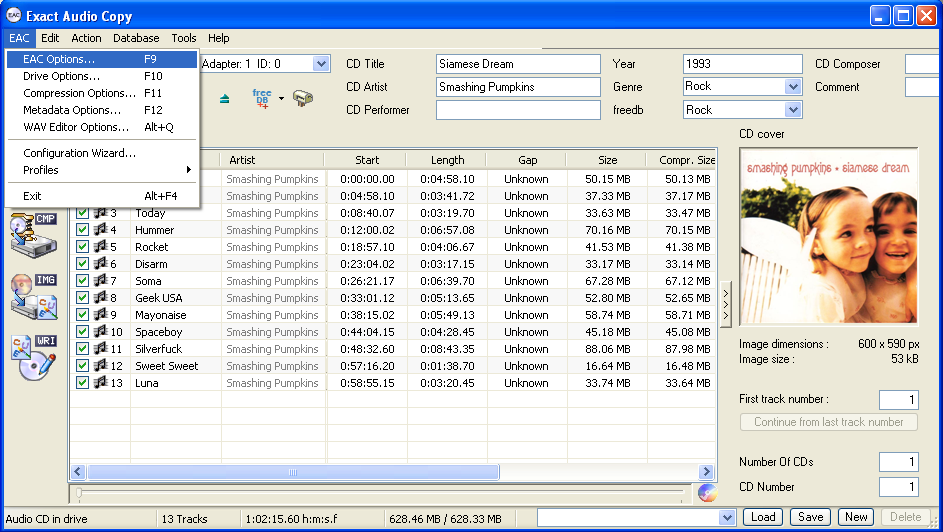
First, let's set up our options correctly. You will have to drag your mouse over the EAC menu in the upper left hand corner of the EAC program window. Once you click on that heading, you will select the EAC Options heading. The screenshots below will show you the options we will change.

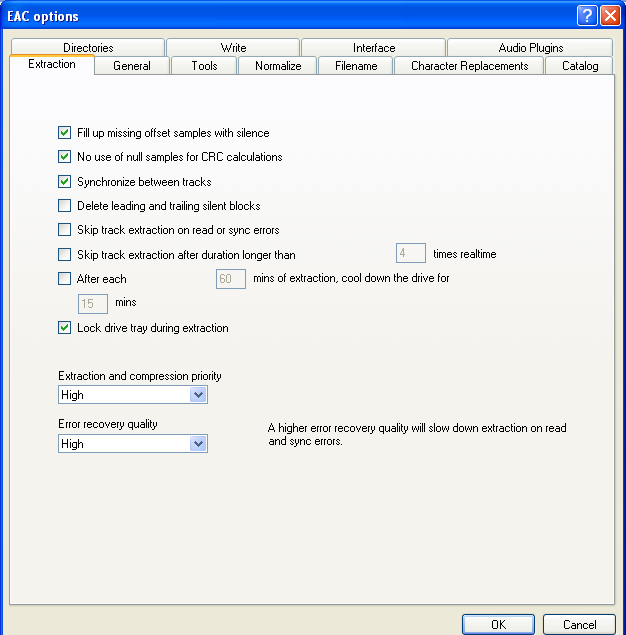
Click on the Extraction tab. You need to set the "Extraction and compression priority" to 'High'. You also need to set the "Error recovery quality" to 'High'. They are set by default at 'Normal' and 'Medium' respectively.
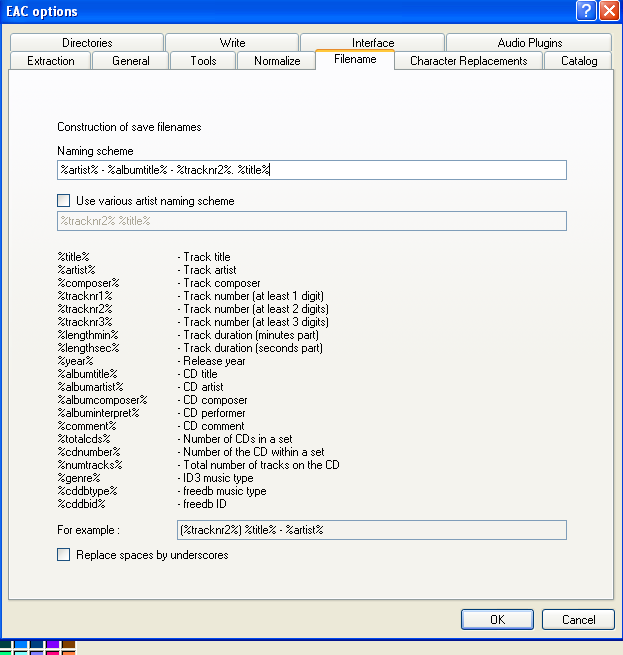
Now click on the Filename tab. This is where you get to decide how your files are tagged. This will dictate how your digital player (JRiver in our case) will display your files in your playlist. You have to copy the exact naming scheme on the left hand side column to achieve what is shown in the right hand side column. If your files aren't getting tagged correctly this is the tab you need to click on to change your settings.
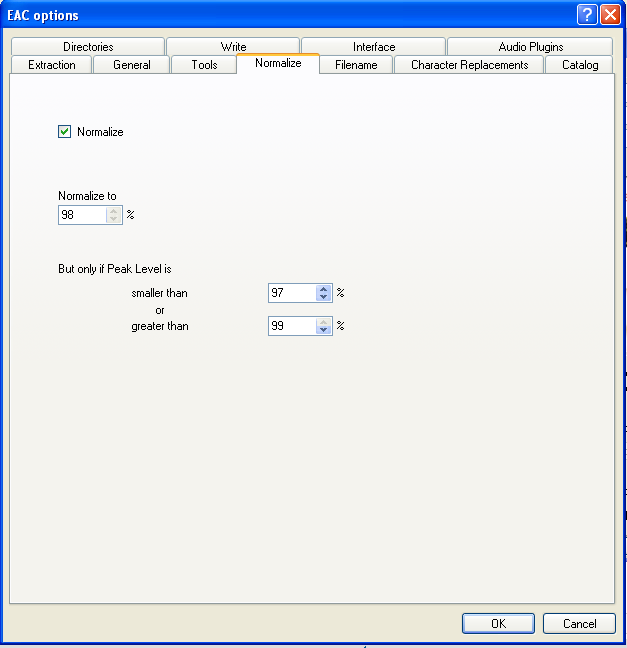
Let's click on the Normalize tab next. Here you can decide if you want to make all your files the same volume or leave them at the studio recorded levels. I like to avoid normalizing my tracks unless there's a good reason to do so. I like to keep the files at the same volume they were originally recorded at to preserve the artist's work and this way I don't alter them.
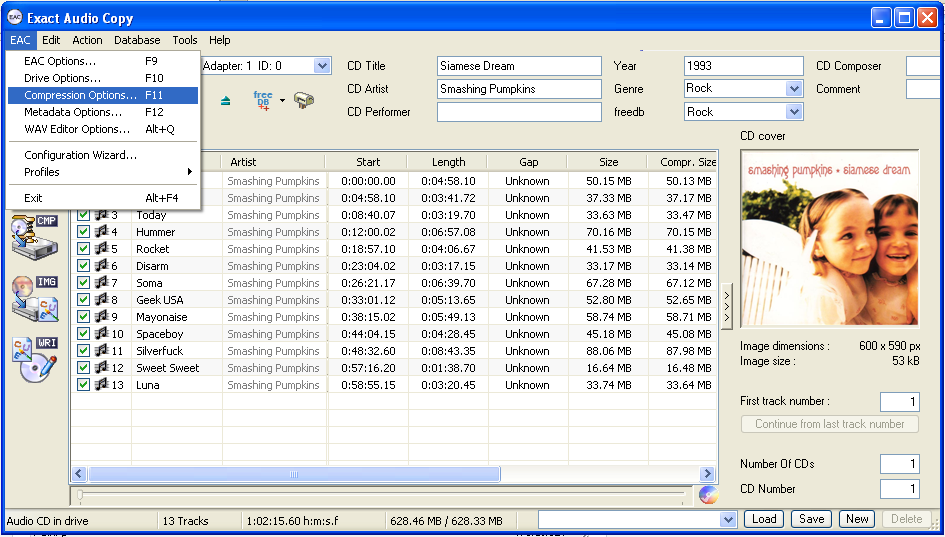
Now we need to go back to the EAC menu and select the Compression Options heading. This is where you select what format you want your ripped files encoded to (WAV or FLAC).
I prefer to output my files in the WAV format as there is NO COMPRESSION in this format. FLAC is another option but the files will be slightly compressed. The compression is lossless so you can get the information back if you need to down the road. I just choose to stick with WAV so I don't have to worry about it. Hard disc space is cheap these days!

Now click on the Waveform tab. I am showing you how to select the WAV output format. You can choose FLAC as an output option as well. Select the options that I have in the screenshot below to output 16/44.1 stereo WAV files.

Once you've chosen your output format you need to go to the Metadata Options heading as shown below.
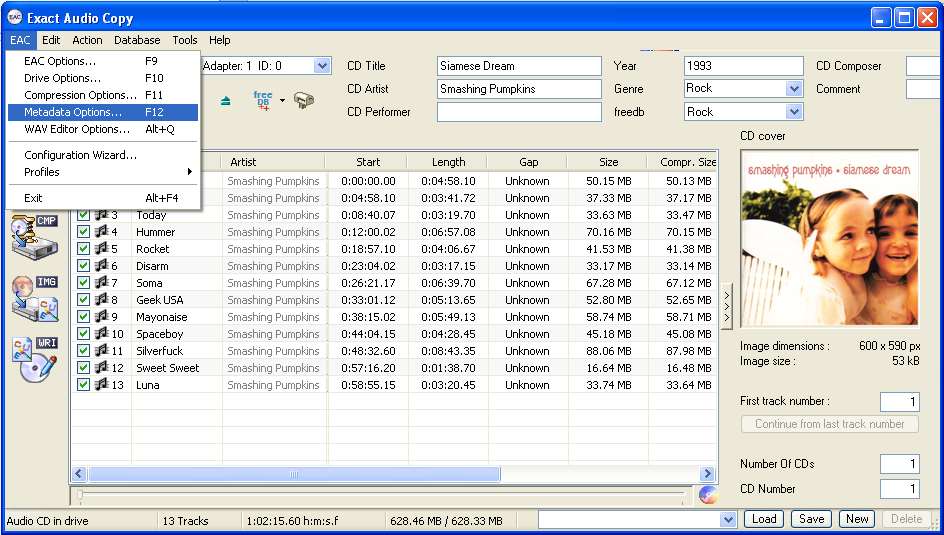
From here you will select the Metadata Provider tab. Choose the "freedb Metadata Plugin" option to allow your CD's track and title information to be automatically completed for you within the EAC program. When you are back in the main program window hit the 'freedb' button in between the 'Eject' button and the 'Mailbox' button. This is how you get freedb to find your specific CD in its database. Make sure to check the freedb information that is automatically input and feel free to change any mistakes. There are mistakes every now and again so check the info! Also, the information in the "CD Title", "CD Artist", "CD Composer", etc. boxes in the upper right hand portion of the program window will show up in your file names/ tags. Change these headings to whatever you prefer or leave them as-is.
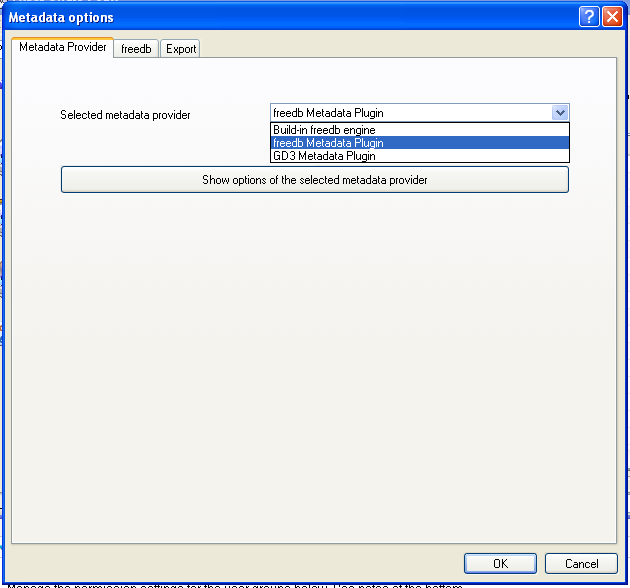
After EAC checks for track and title information it will automatically ask you if you'd like to search for album art. I go ahead and perform the search and then I decline to search for CD lyrics in the next step. That is up to you.

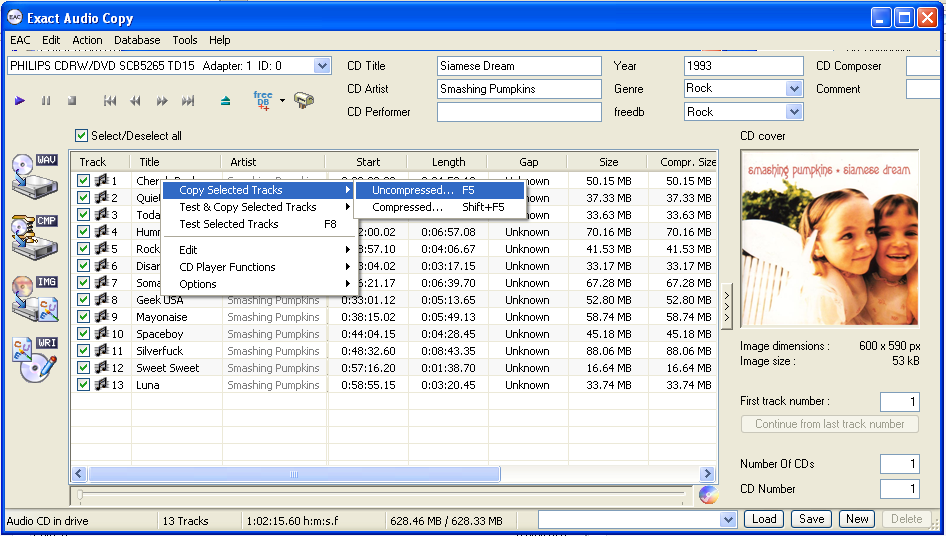
Now that you're all ready to go let's rip the CD! Check the boxes next to the tracks you want to rip. This allows you to skip that track you never listen to, etc. Right-click on one of the tracks (any track will do) and select "Copy Selected Tracks" and then select "Uncompressed". EAC will then ask you where you want to save your files. Point the program to your desired location on your hard drive and then watch EAC rip your files!
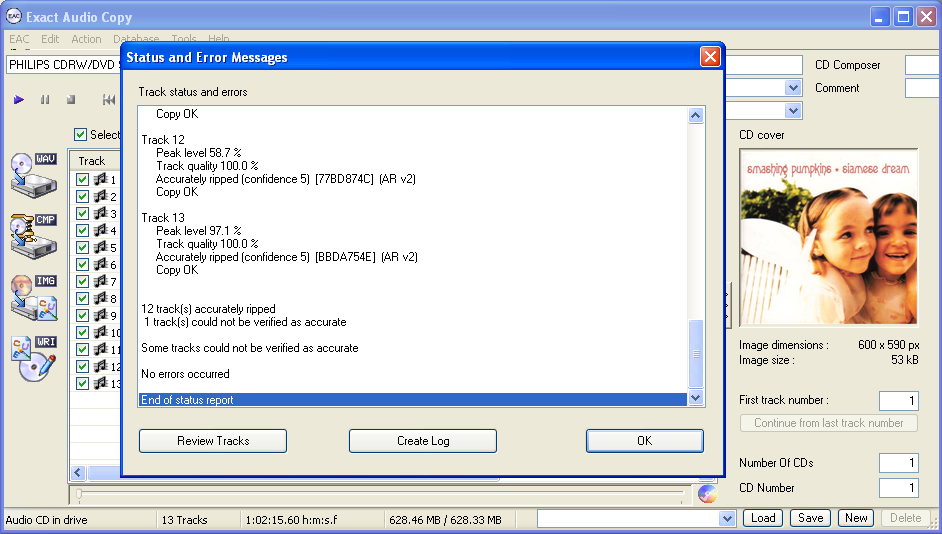
When EAC is finished ripping your CD it will show you a report of what happened during the rip. It shows the levels for each track, track quality, if there were any errors during the rip, and where in the song ("suspicious position") the error likely occurred. VERY NICE!
Now you are an EAC CD ripping pro! It's that easy.

------------------------------------------------------------------------------------------------------------------------------------------------------------------------------------------------------------------------------------------------

Now we will look at ripping with Foobar 2000. It's actually a little easier than using EAC since there are a few less steps to set the program up. Overall, I feel they are about the same in terms of user-friendliness once you have the initial set-up configured. The only downfall I see with Foobar is the fact that you have to manually input track information if it doesn't automatically come up and there's no error report after you're done.

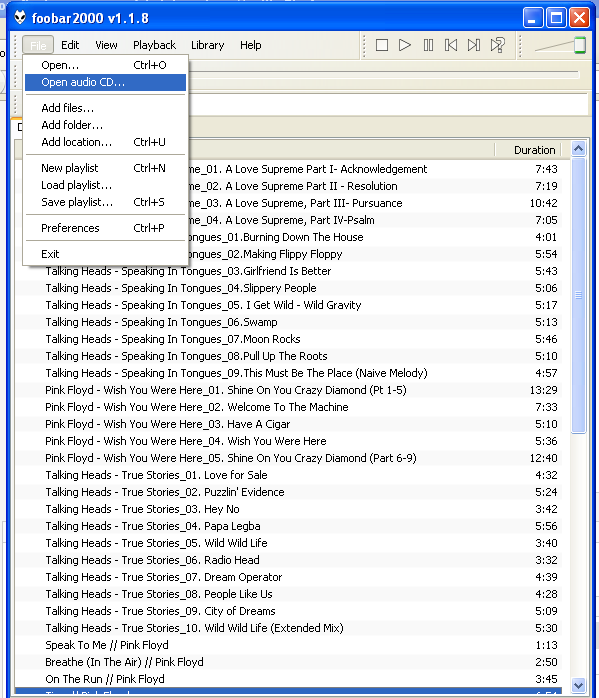
Download the Foobar 2000 program here. Click on the executable file to install the program. Once installed, place your CD in your CD Rom drive to begin. Click on the File menu at the upper left hand corner of the Foobar program window. Now select the "Open audio CD" heading.
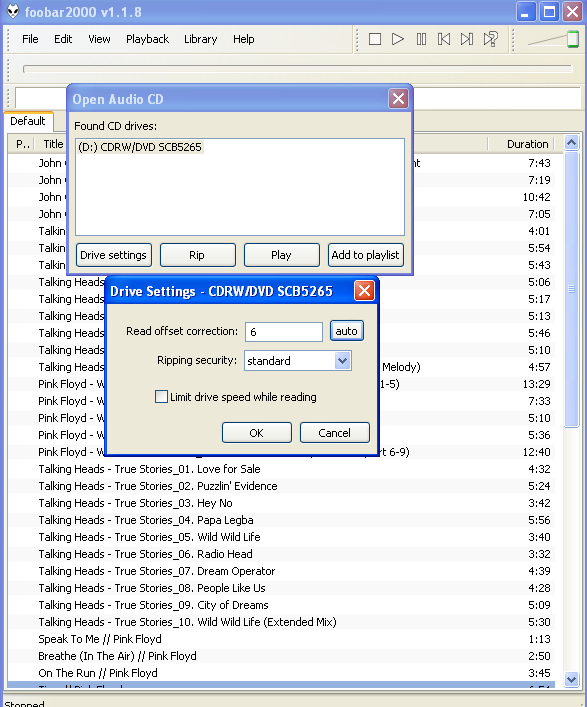
Now you need to click on the "Drive Settings" button on the "Open Audio CD" window and the "Drive Settings" window should appear. In order to get the correct CD Rom drive settings, you must click on the "auto" button adjacent to the "Read offset correction" heading. My drive setting was automatically set to 6 after hitting the "auto" button. Now set the "Ripping security" to "standard". Press the "OK" button and you will be taken to the "Rip Audio CD" window.
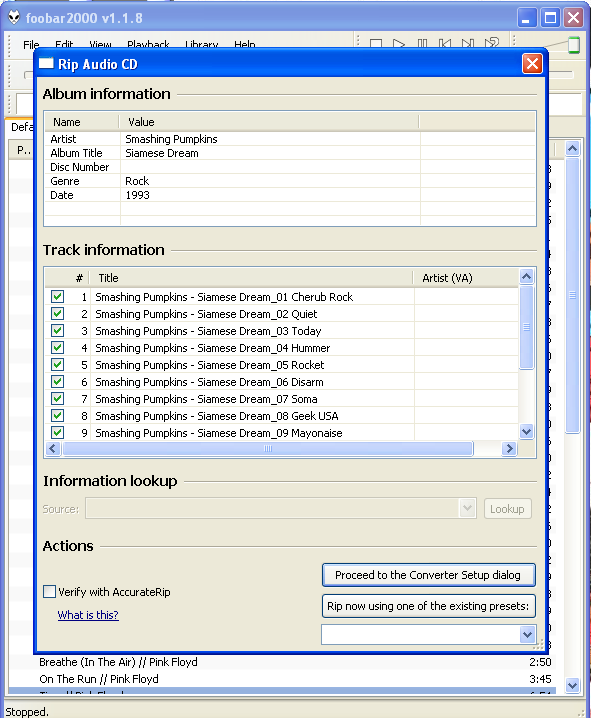
This is where the user has to manually enter the CD data within the "Rip Audio CD" window. I'm sure there's a way to get the info automatically but I didn't bother figuring it out. There's most likely a downloadable plug-in to enable the freedb database or something along those lines. Pay attention to your naming scheme here. Don't just type in the name of the track. Input the full file name you want to see in your playlist BEFORE you move on to the next steps. Don't forget to enter the album information at the top of the window as well.
It's time to tell Foobar what output format you want for your files to be encoded to (WAV or FLAC). The default output format is set to WAV. I haven't played around with how to get to a different output format for my files but I'm sure it's not too difficult. (I assume you click on the "Output format" link and you can set it up there) If everything looks good, it's time to hit the "Convert" button and start ripping!                                                                                                                            
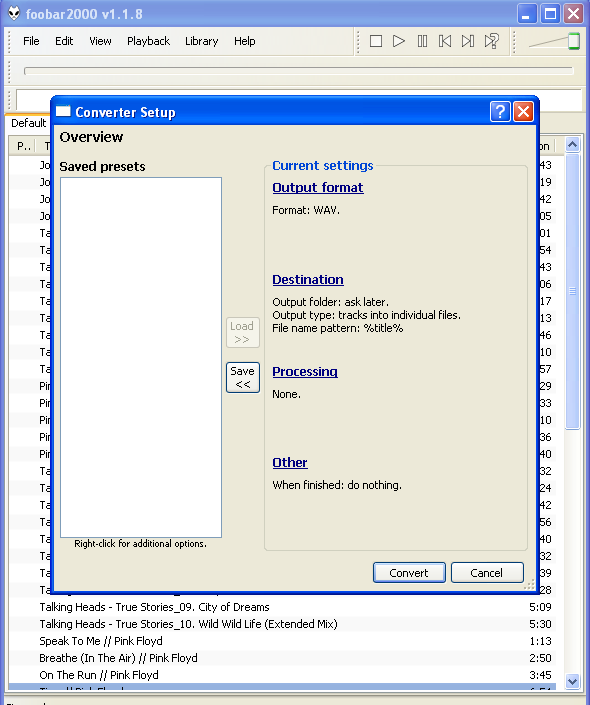
 Foobar will ask you where you want to save your ripped files after you hit the "Convert" button. Point Foobar to your destination folder and then hit "OK".


Now the ripping progress window should pop up to show you where you're at in the ripping process.

You're almost done. When the rip finishes, the "Converter Output" window will pop up and show you your file names and their duration. Unfortunately, there's no error report, track quality assessment, or suspicious position report either. That's a bummer but what are you going to do?
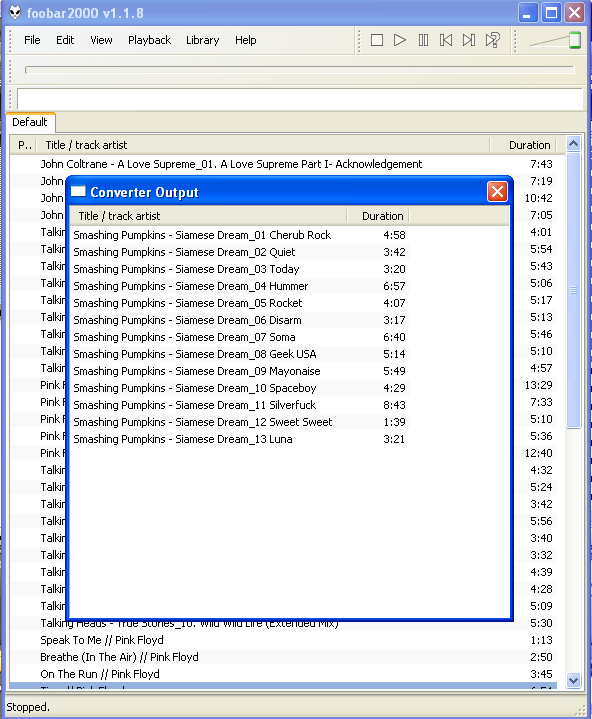
I still feel EAC wins in the ripping software department due to the error reports and the freedb database access. Scratched and dirty CDs will be easier to "keep an eye on" due to the suspicious position report in EAC as well. Se la vi!

--------------------------------------------------------------------------------------------------------------------------------------------------------------------------------------------------------------------------------------------------------------------------------------------

Now I will briefly talk about the DVD-AudioHDAD/ DAD/ Dual Disc ripping software that's available. I love the idea of a "Digital Audio Disc" or any type of Hi-Res disc. What a great idea. I'm a little upset with Sony as none of the SACD titles seem to be available for download on HDTracks or anywhere else for that matter. Something tells me it has to do with money.

I'll get over it hopefully some time down the road. Maybe that time will come only after 'Kind of Blue' and 'Time Out' are released in 24/96 or 24/192 FLACs. I know, I should just keep dreaming!

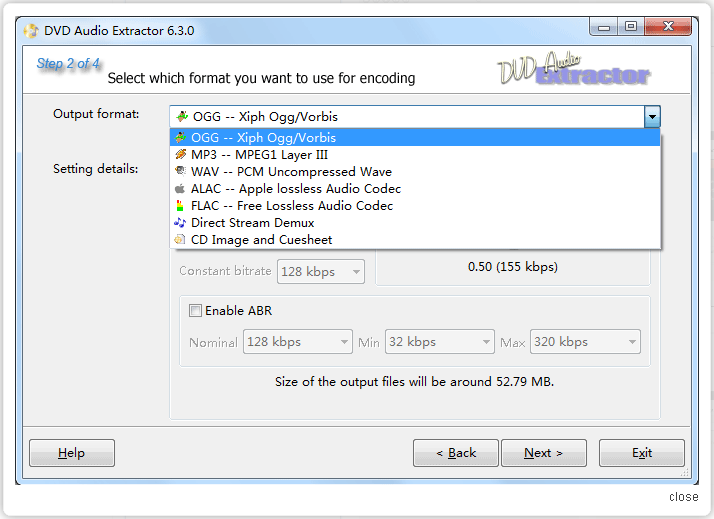
One software suite available to rip these Hi-Res discs costs just under $35. The software is called DVD Audio Extractor. There is a free DVD-A ripping suite called DVD Audio Explorer. I have experience with neither program. It looks like the program you have to pay for is the easier one to use. Go figure! My goal here is to introduce folks to the concept of ripping their Hi-Res discs instead of having to pay for Hi-Res downloads. If you have a decent collection of DVD-Audio discs, this is a worthwhile investment.

I have enclosed a few screenshots of the DVD Audio Extractor for your reference.
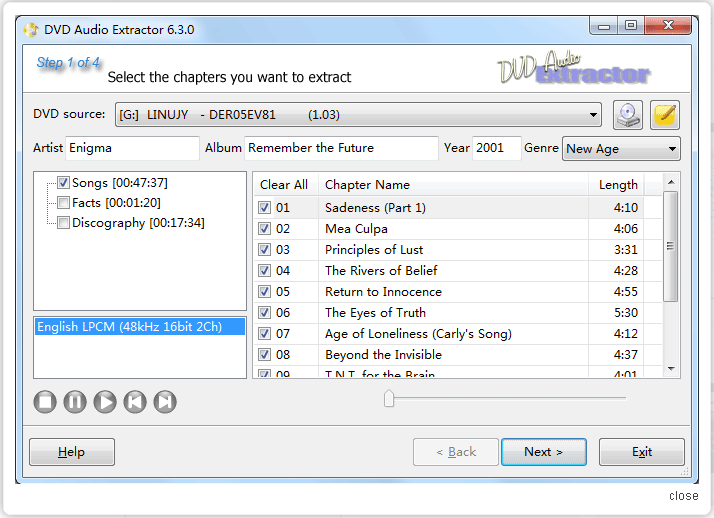
Now that you've been exposed to these various optical disc ripping software suites, there's no excuse to not be able to rip anything but a SACD. Go rip your heart out folks!

THANKS for reading!

 -YFS Design Team


by Mike OBrien on 03/10/2012

WHY DO I NEED ACOUSTIC TREATMENT IN MY LISTENING ROOM?

Does the average listener need acoustic treatment?  If you listen to MP3’s through ear buds the answer is no, but on the other hand you wouldn’t be reading this if that was the case!  Just about any room can benefit from acoustic treatment of some sort. This could be as simple as adding corner absorbers to control bass boom, to total wall and ceiling treatment with tuned absorbers, diffusers, and reflectors such as in our main listening room. The importance of controlling modal coupling and reflections is blatantly obvious at many audio shows where award-winning speakers are almost unlistenable. This is usually due to room size, room proportions, and poor (or no) acoustic treatment. Unfortunately, most of us do not have dedicated listening rooms so an acoustic compromise is inevitable. For this reason, we audition speakers and components in three acoustic environments; our fully treated listening room, a long (1.6:1) furnished living room with speakers on the short wall, and a furnished living room (1.8:1) with speakers on the long wall.  It is amazing how different the same system can sound!  Many clients can’t believe how different their speakers sound in our listening room where reflections and room modes are controlled. There is noticeable clarity of the upper mid and highs, lack of bass boom, and no hangover in the lower octaves (sometimes misconstrued as lack of bass).

Simple treatments such as corner bass traps can go a long way in taming an unbalanced or resonant system. Absorbers are only part of the answer. Diffusers and reflectors allow tweaking of the temporal response of a room. We have been able help certain rooms by simply rearranging furniture, adding wall hangings, and moving/adding plants to provide absorption and diffusion. This generally has a much higher WAF (Wife Acceptance Factor) than sticking 4’x4’ blobs on the walls and moving everything out of the room. We have made many aesthetically pleasing custom size covered wall panels (absorbers and diffusers) for wall placement as well as full wall installations. Anyway, a little acoustic treatment can go a long way in wringing out the detail in any system.

Thanks for 'tuning' in!

 - MOB

by Kevin OBrien on 2/18/2012

IS A COMPUTER OR A CD TRANSPORT THE BETTER SOURCE COMPONENT?

Is a computer the better way to go or should you stick with your CD transport for a music source when partnering up with a DAC? If you have a USB capable DAC then it really is a no-brainer. Go with the computer! It may require some patience getting everything set up and running smoothly but once you have the setup behind you, it is the way to go. If you do have a USB capable DAC then you may be missing out if you are still using a CD transport!!!

Fairly new DACs even just 5 years old may not be using the most current technology. Unfortunately, DAC technology drastically changes with the advent of newer high-tech chip solutions so it's best to keep up with them if possible. Many newer USB capable DACs are in the $2,000 to $6,000 range but many can be had for under $2,000! If you do not want to take my word for it, just look at the various offerings from Ayre Acoustics, Wyred4Sound, Eastern Electric, Benchmark Media, and NuForce to name a few.

I have personal experience with the W4S DAC2 and the Eastern Electric Minimax DAC MkI and MkII. These are all VERY nice DACs and are under the $2,000 mark. It is convenient to have the option to just run a USB cable to your DAC from your laptop or server but if you find that you cannot go out and buy a new DAC then a USB to SPDIF converter may be up your alley as well. This is especially true if you already own a VERY expensive DAC that you love and do not want to part with it. This allows the user to use a computer for their music source and still keep their favorite DAC. This holds very true in the case of the dCS crowd out there who have spent over $10,000 on their DACs.

M2Tech makes a few USB to SPDIF converters that are all under $500 and many companies are offering converters for less than that. I have personal experience with the M2Tech EVO which I find works very well once partnered with an external power supply. I have also heard of several manufacturers such as Halide Design, CryoParts, Musical Fidelity, April Music, Bel Canto, and Audiophilleo who produce converters as well. All of these offerings except the CryoParts Sonicweld Diverter and the Audiophilleo are under the $500 mark.

I highly recommend transitioning over to your laptop or computer server for your music source based on the fact that these solutions alleviate the need for an actual optical spinning disc and therefore reduce jitter. This is the only theory I have come up with to explain what I have experienced in my system. I have ripped CDs to WAV files and saved them on an internal hard drive and the playback results were better than any compact disc playback system I have heard to date in my system.

Say what you like but the longer you put off the move to digital audio files as a source, the more you are missing out. If we take into account the fact that more and more hi-res files (24/96 and 24/192 FLAC files) are becoming available for purchase, then you really start to see what you are missing out on. CDs sound great, even though I prefer vinyl to CD, but if you have not heard digital files via USB into your DAC then you have to give it a try! 

DON'T WAIT ANY LONGER!!!

-KOB

by Kevin OBrien on 05/19/2012


***UPDATED ON 04/10/2022 - Scroll Down to the Bottom of the Article***


 HOW DO DATA-ONLY USB CABLES WORK?

We wanted to update this article as a lot of things have happened since we first posted it. Some basic principles have now been laid out as we've had more time to test our theories and see how USB devices behave under certain circumstances. We're pretty sure there are a lot of facts floating around out there that just aren't true. What's a data-only USB cable? When do they come in handy and can I use them with my equipment? Do they make a difference in terms of sound quality?

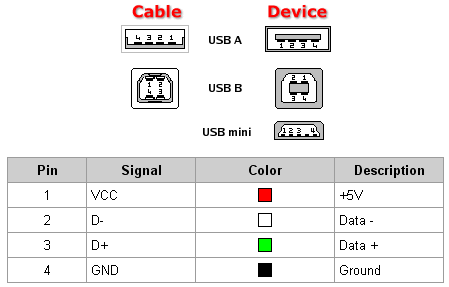
First off, what is a "data-only USB cable"? A data-only USB cable is a cable that only contains the + and the - data leads. It does not contain the +5V power lead. lt SHOULD contain the ground lead. This type of USB cable is what is known as "Data-Only". You CANNOT just assume since your USB device is plugged into a power source that you do not need the power lead on your USB cable! That is just plain wrong.

All this depends upon which USB input receiver your DAC is implementing. A lot of USB DAC's are going with the XMOS USB input solution. Just as many are opting to use M2Tech's OEM USB input solution. Other manufacturers are choosing to use the Tenor USB input chips. An extreme minority are using the Via USB input chip. And lastly, the C-Media USB input board is also just hitting the audiophile USB scene. Another very cool thing we are starting to see is designers creating their very own custom USB input boards! In this case, you'll need to talk to the designer to find out if he or she is using USB power.

If you are planning on using a data-only USB cable, your USB input device may contain the M2Tech USB input board or possibly the Via board. If it contains any other USB input method mentioned above, it will most likely run on the 5V USB power bus. The few main exceptions to that rule are the Ayre Acoustics QB-9 DAC and the Auralic Vega DSD DAC. These units employ the XMOS USB input chip. The XMOS chips in these instances get their power from the power supplies inside the DAC's instead of from your computer's USB bus. Also if you own an Audio-GD DAC, which implements the Via USB solution, it's best to contact King Wa directly to see if your DAC uses power from your computer's USB bus or not. Every other DAC (that we know of) that employs the XMOS, Tenor, and C-Media chips gets its power from the computer's USB bus. Use this rule to figure out if your DAC could benefit from a specialized USB data-only cable design.

We offer our current 'Reference' YFS USB 2.0 interconnects in a 'Data-Only' option, a 'Standard' option as well as a 'Dual-Headed' or 'Split' option. The 'Data-Only' USB cable is just like the name sounds. This is your typical USB cable design with the +5V power lead removed. The ground lead is intact. The 'Standard' option is the conventional USB design with all 4 conductors intact. The YFS 'Dual-Headed' or YFS 'Split' Ref USB cable along with our YFS PS-5 power supply are specifically designed for DAC's using the XMOS, Tenor, and C-Media USB input chips. This design isolates the data leads from the power leads until the two meet at the DAC's input. It doesn't seem at first glance that this split cable design should elevate performance. We didn't believe it either so we tried it and sure enough there was an audible difference between the conventional USB design and the 'Split' design. Isolating the data and power leads appears to limit interference between the two which results in deeper, wider, more accurate soundstage and more separation between instruments and overall better presentation of the music.

We have compiled a list of known DAC's that will benefit from the 'Split' USB cable design. This list is not complete and we'd appreciate it if our readers could help us complete it as time moves forward.


USB Bus Powered DAC's/ SPDIF Converters:
 

SPDIF Converters

Anedio U2 SPDIF Converter
April Music Stello U2 24/96 USB Link
April Music Stello U3 24/192 USB Link
Audiophilleo 1 & 2
Bel Canto USB Link
Bel Canto mLink
Bel Canto uLink (NOT Bel Canto REFLink)
Berkeley Audio Designs Alpha USB
Bravo USB to S/PDIF Converter
Channel Islands Audio Transient MKII USB Converter (without 5V PS)
Firestone Audio SPDIF converter
Lindemann DDC
M2Tech HiFace TWO
Musical Fidelity V-link I / II / 192
Resonessence Labs Concero
Sonicweld Diverter HR
SOtM dx-USB HD
Soulution 590 USB converter
Stahl-Tek A.B.C.
Wavelength Audio Wavelink HS


DAC's

Abbingdon Music Research Digital Processor 777
Aesthetix Romulus Transport/ DAC
Aesthetix Pandora DAC
Anedio D2 DAC
Apogee Mini-DAC & Duet 2
April Music Eximus DP1
Atoll DAC 100
Audionet ART G3
Audio Research DAC 7
Avid Pro Tools 9 & 10 Mbox Mini
Bel Canto DAC 1.5
Bel Canto DAC 2.5 (NOT Bel Canto DAC 3.5 - NO USB Input)
Benchmark DAC1 USB (Original Version - Latest DAC1 is NOT compatible)
Benchmark DAC2 HGC USB
Beresford USB DAC TC-7520
Bricasti Designs M1 USB DAC
Bryston BDA-1
Bryston BDA-2
Burson Audio DA-160
Burson Audio Conductor
Cakewalk UA-25EX CW USB Audio Interface
Calyx Femto DAC
Calyx DAC 24/192
Cambridge Audio DAC Magic
Cambridge Audio DAC Magic Plus
CEC DA53
Centrance USB Devices
Chord QBD76 (NOT Chord Cute HD)
dB Audio Labs Tranquility SE DAC
dCS USB Capable DAC's (All Models)
Devilsound DAC
Digidesign MBox 2 mini
Edirol UA1A USB Powered Audio Interface
E-MU 0204 & 0404
EMM Labs DAC2X
ESI Dr. DAC nano
Firestone Audio Fubar II & III
Focusrite Saffire 6 USB & Scarlett 2I2
Hegel Hd2
HOTaudio Extasy USB DAC
HRT Music Streamer (All USB Bus Powered Models)
IBUKI Musica DAC's & Amps
Jolida Glass FX DAC I / II / III
Jolida Fusion DAC / Transport
Kingrex USB DAC's & USB Amps
Korg DS-DAC-10
Lindemann DAC 24-192
Lindemann 825 HD Disc Player
Marantz NA7004 Network Audio Player/DAC
Matrix Audio X-Sabre DAC
Maverick Audio - DAC TubeMagic D1 & D2
M-Audio Fast Track USB & Fast Track C400 & C600
Meitner Audio MA-1 DAC
Meridian Audio Explorer [Headphone Amp/USB DAC] (XMOS)
Metrum Acoustics Octave MkII (NOT MkI or HEX)
Musical Fidelity V-DAC (NOT the V-DAC II)
Musical Fidelity M1 DAC
NAD M51 USB DAC
Native Instruments Komplete Audio 6 & Traktor Audio 10
Northstar USB DAC 32 Essensio (NOT Northstar 24/192)
NuForce Icon 1 & 2 HD HDP uDAC-2/ uDAC2-HP
Peachtree Audio novaPre
Peachtree Audio Grand Pre X-1
Perreaux Audiant DP32/ Audiant 80i
Presonus Audiobox 22VSL & Audiobox USB
Primare DAC30
Pro-ject USB Box
Propellerhead Balance
PS Audio Digital Link III
PS Audio PerfectWave DAC
PS Audio NuWave DAC
Rasteme Rudd14 USB DAC
REGA DAC
Resolution Audio Cantata Music Center
RME Babyface
Schiit Audio DAC's (All Models)
Silverstone USB DAC
SimAudio Moon 100D
SimAudio Moon 300D
Sound Devices USB Pre 2
Stahl-Tek Ariaa DAC
Tascam US 122L / 122 MKII / 144L / 144 MKII (All USB Bus Powered Models)
Teac UD-H01 DAC
Totaldac D1 Reference
Trends Audio DAC
Triode Corporation TRV DAC 1.0
Wadia 121 Decoding Computer
Wadia 151 PowerDAC Mini
Woo Audio WA7 Fireflies
Wavelength Audio (All Models)
Yellowtec PUC2


Please add to the list if possible. If you have indeed tried a DAC and you're certain it uses USB power and it's not on the above list, contact us and we'll add it...

We hope we have shed a little more light on the 'data-only' USB cable and if we answered at least one of your questions we have accomplished what we set out to do here. THANKS for reading!!!

 -YFS Design Team
 

--------------------------------------------------------------------------------------------------------------------------------------------------------------------------------------------------------


*** UPDATED ON 04/10/2022!!! ***


It's been a LONG time since we've had the chance to update this article.  We apologize for that.  We've been busy trying to deal with the hackers and online threats the past few years.  We finally got our website back up and it's SAFE and secure now.  So, it's time to update it and add new material, FINALLY.  THANK YOU for your patience!

We have seen a pretty standard HiFi industry trend in regards to USB cables and DACs. This also pertains to SPDIF converters. Most manufacturers are choosing to use the internal power supply within the converter to handle the +5V power needs of their USB inputs. This is a great thing for everyone involved. This allows the sound quality of most systems to be elevated by default. What becomes tricky is figuring out if your DAC or SPDIF converter needs a 'Split USB' cable and a +5V power supply or not. Not to worry, we have you covered.

There's a 90% chance you don't need a 'Split USB' cable these days. Almost every listener will want to stick with the standard, run of the mill 4-conductor USB cable configuration. This is the cable configuration you would use to tether your pre-wireless printer to your desktop computer. Also, there's really no need for 'Data-Only' USB cables anymore. Without the +5V power lead, there's no way for your converter to talk to your source. Sources such as laptops, Mac Minis, Streamers, and general desktops need to 'handshake' with their devices by sending data back and forth. This is the very first step your source and DAC take when you turn them on. Without the +5V lead in your USB cable, your front end gear will not 'see one another'. Once a relationship has been established between source and device, signals are no longer sent via the power lead. If for some reason your gear doesn't require this 'handshake', there's no point in removing the power lead in your cable as there's no power running through it to interfere with your data signal. Keep it intact for your next DAC purchase down the road.

If you happen to be using any of the Mutec converters, you will still need a 'Split USB' and a +5V power source to maximize performance. The same principle goes for the Mola Mola DAC and the older EMM Labs / Meitner DACs. If you have the original, non-V2 versions of these EMM converters, you will still need the 'Split USB' and +5V power source for your USB inputs. If you have the EMM 'V2 upgrade' or own an EMM DV2, you are all set with the 'printer cable configuration' for your USB cable. The Sonnet Digital DACs are another set of converters that need a 'Split USB' and +5V power source to sound their best. Cees does place a 5V regulator on his USB input board but we still feel starting with an audiophile-grade +5V power supply and a data / power-isolated USB cable is the superior solution. 

If you know of another converter that still benefits from the 'Split USB' architecture, PLEASE let us know by kindly dropping us a note via email. We will add it to this article for everyone's benefit...

Thank you for tuning in. Until next time...

- KOB


Subcategories

General F.A.Q.

Computer Audio F.A.Q.s

Acoustics F.A.Q.s

USB Cable Design F.A.Q.s

Connect with us today!