by Mike OBrien on 02/22/2012
YFS CUSTOM CA-15a VACUUM TUBE PREAMPLIFIER
First, let’s keep in mind that this is not a dissertation on vacuum tube amplifier design, nor was this an attempt to produce a top notch audiophile preamp. We are describing the evolution of one of our custom preamps. If you are interested in circuit design there is a myriad of books and articles available (or drop us a line for specific questions).
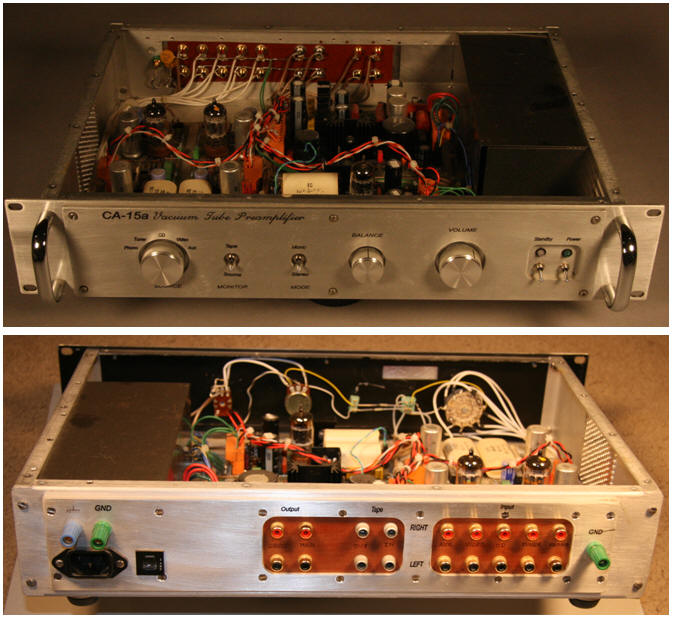
Through the years five units with various chassis designs (customized inputs, outputs, and controls) were built, and several were upgraded. The CA-15 started in the late 80’s as a test bed for vacuum tube preamp designs. Our circuits were common topologies with obvious sonic limitations but the idea was to start with a “classic sound” and incrementally improve upon it. Simplicity was the key. What does a simple circuit sound like? We were pleasantly surprised, it wasn't world class but it was much more open and realistic than several respectable solid state preamps we tested. Through the years, pretty much at random, we tweaked the design to improve performance (usually as a break from other extended development projects).
Each section of the preamp (power supply, high level, and phono) was an optimized version of a classic topology. A suite of switched inputs, direct output (after the volume/balance), high level output, a tape loop, and a mono switch were included. After many modifications, stints in dorm rooms and apartment moves, the unit is pretty beat up but is still working just fine. As a matter of fact, modified versions of the original PCB’s are still functioning in one of our first customer’s preamps! Remember that the objective was to see how a simple “classic” topology built with modern components would sound. It was used as a reference for evaluating upgrades and new topologies. As it stood, many jaws dropped when paired with solid state class A output power amps, especially with vinyl as the source. Compared to solid state and IC preamps of the time, the midrange detail and smoothness was startling. It did lack the bass punch and high end sparkle associated with top solid state and tube preamps of the time. To no one’s surprise it didn’t stand a candle to the old SP-11 (I’m convinced the 11 stood for number of tubes in the unit)! With limited bandwidth and a relatively soft power supply one can’t expect the world.
CA-15 Original Design
The power supply was a simple all solid state design using standard rectifiers and electrolytics with metalized polycarbonate film bypass capacitors in both the filament and high voltage supplies. Capacitance multipliers provided reasonable L and R channel isolation but there was no regulation per se. As in all our designs, separate filament and high voltage transformers were employed to eliminate any switches in the secondary circuits. The standby switch allowed tube filament to be warmed up before applying high voltage. A delay/standby circuit was also powered from the filament transformer. Although the version shown sports a magnetic/electrostatic shield over the power supply transformers and AC section, the original CA-15 was open with the transformers oriented for minimum hum.
The high level circuit was a simple 12.5 dB gain Mu follower built around a 12AU7 with 100K input impedance and metalized polypropylene output blocking capacitors. Outputs were shorted by a timer operated relay allowing the high voltage to stabilize before connecting to the power amp (no pops due to DC offsets). Both carbon film and carbon composition resistors were used.
The phono stage was a classic 12AX7 two stage cascaded triode topology with bypassed cathode resistors to maximize stage gains. Active global feedback using a simple three element network eliminated issues with DC at the summing junction (cathode of first stage) but only approximated the ideal RIAA response. Feedback network components were 1% metal film resistors but the mica capacitors were only matched to 3%. Midband gain was 42 dB.
CA-15a and MK1 Versions
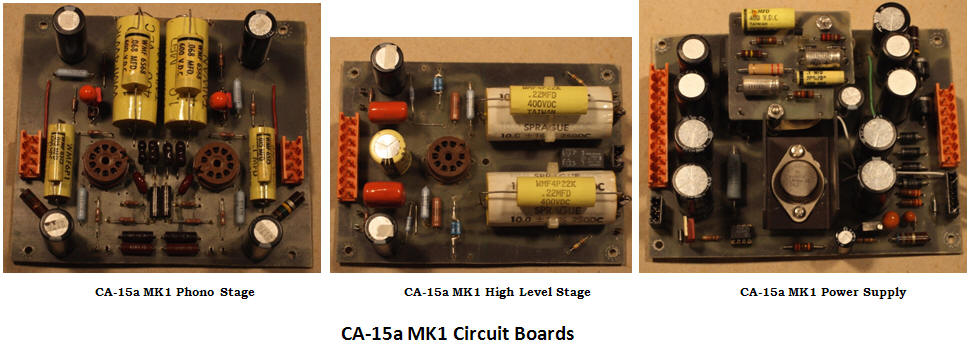
The next step was to update each sub circuit to more modern topologies, hence the “a”. The input switching made 1:1 comparisons simple. No modifications were made to the power supply for the first iteration, only high level amp and phono section were changed. The MK1 version had identical topology but included extra bypass caps, current source regulator zener string, and closer RIAA equalization network matching. 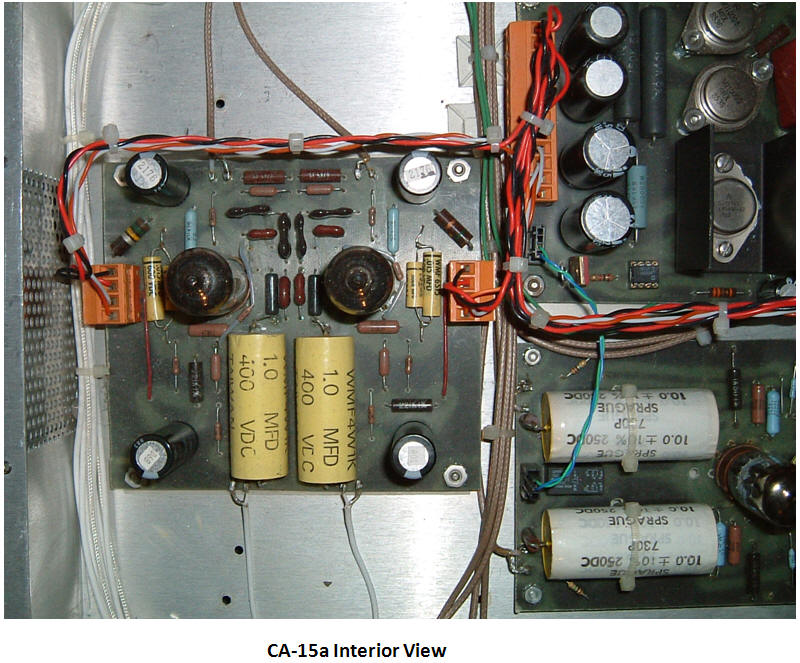
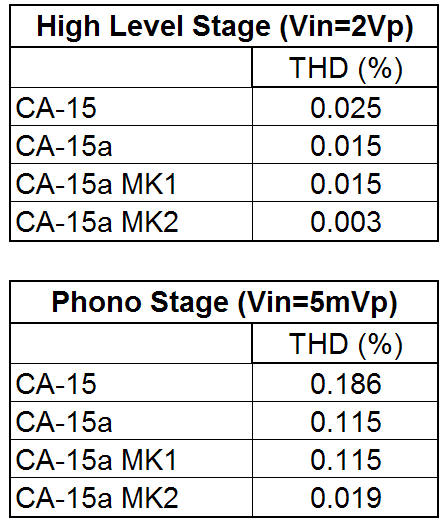
The high level section maintained the 12AU7 but employed a common cathode topology with unbypassed cathode resistors to control gain. Optimizing for minimum THD and dynamic range left us 14 dB of gain, a bit too much. The musical detail and bass response was noticeably better, probably due to the metal film resistors and extra high voltage filter capacitors. Unfortunately the stage had relatively high output impedance, not so good for driving long or high capacitance interconnects.
The phono stage retained the basic twin cascade topology but a small amount of positive feedback was achieved by resistively coupling the cathodes. This increased the open loop gain allowing a midband gain of 43 dB and response much closer to the ideal RIAA curve. Mica capacitors in the feedback network were matched to 1% which anchored the sound stage by reduced channel to channel “wandering”. High voltage filter capacitance on the PCB was also doubled.
Sonic improvement was immediately noticeable, especially in the midrange, but the bass was loose and the treble region was slightly muted. Everyone thinks I’m being over critical here, but after all, the whole idea was to make significant improvements over the reference topology. Overall, not bad and well worth the effort since it still outperformed the reference and several commercial preamps. One negative was the noise from the phono stage, a common problem when using low transconductance tubes in high gain circuits.
CA-15a MK2
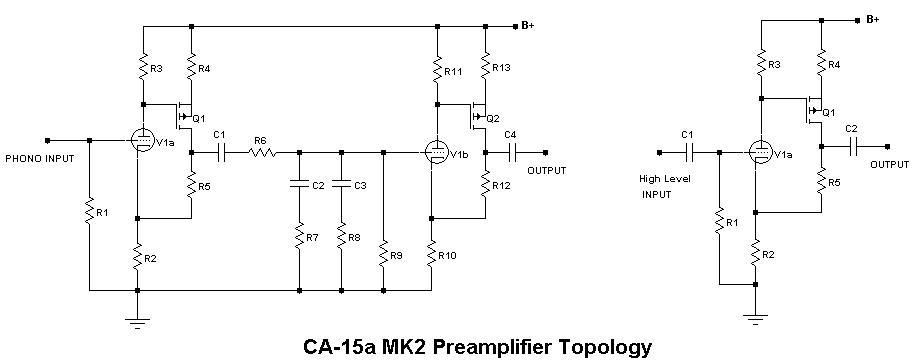
The objective of the final phase was to adjust gains to better suite modern sources, i.e. reduce high level stage gain and increase phono stage gain. I chose a hybrid topology where the tube contributed the majority of the gain and local feedback controlled overall stage gain. This is the current incarnation of the CA-15a being used in our lab/listening room.
A few simple modifications were made to the power supply which included converting the capacitance multipliers to buffered zener regulation, adding high voltage filter capacitance and polypropylene bypass capacitors, and increasing the high voltage transformer VA rating (doubled the core volume).
The hybrid high level stage retained the 12AU7 as the input but the plate is directly coupled to a P-channel MOSFET running at relatively high current. A series of resistors bias the output MOSFET, set second stage gain, and provide feedback to the cathode. Its low output impedance allowed the stage to drive long high capacitance interconnects without loss of highs. Total gain for the stage is only 9 dB, commensurate with the typical DAC level.
The passively equalized phono stage employs 0.5% matched metal film and polypropylene capacitors. It is implemented using two gain stages similar to the above topology. High input impedance and low output impedance are real advantages in this application. Lower resistor values for RIAA network (lower noise) can be selected without loading down the input stage or causing nonlinearity operation. Higher open loop gain allows accurate equalization over an extended frequency range (10Hz to 40kHz). Keeping the 12AX7 and directly coupling the plate to a MOSFET provides a midband gain of 50dB bringing the phono output to nearly the same level as a DAC through the high level stage.
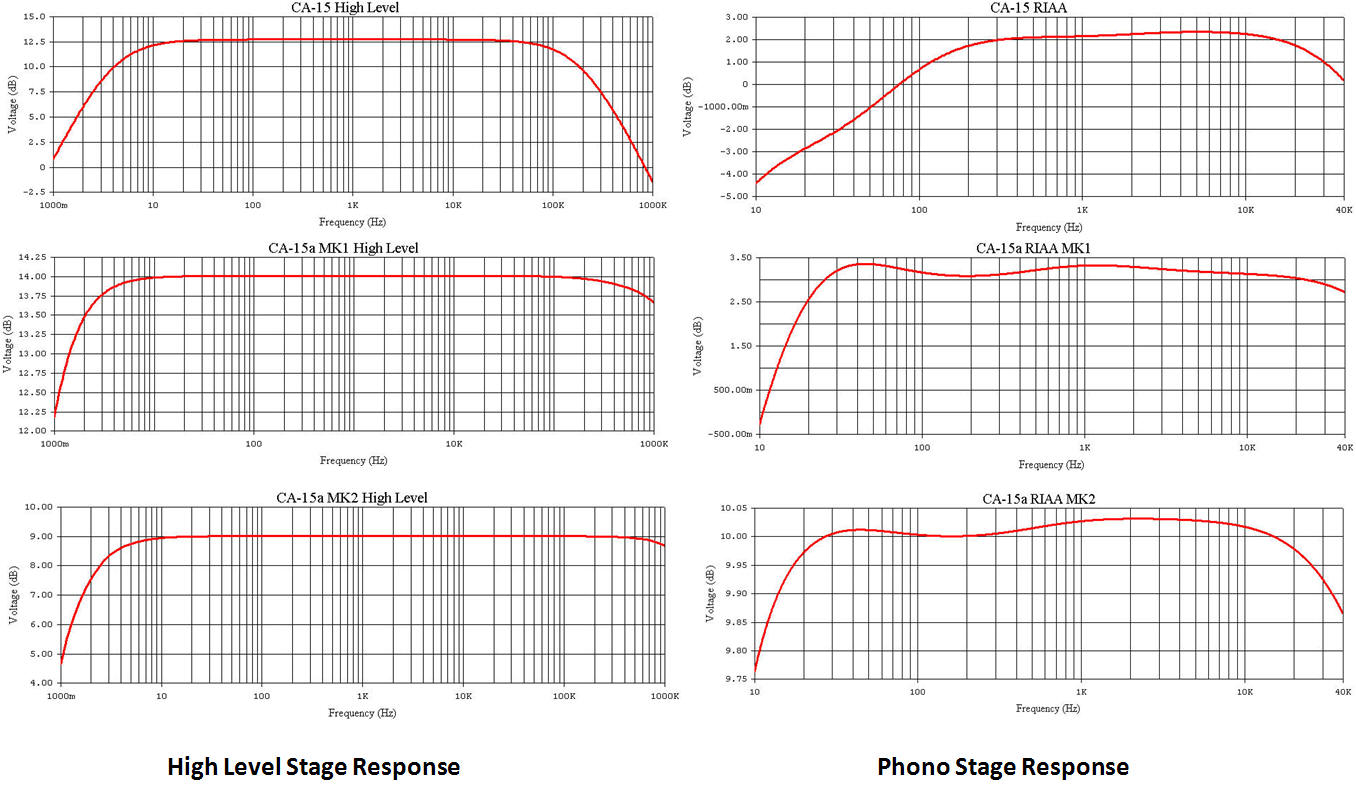
The more accurate RIAA equalization evens out the response and extends the bass and the treble regions, bass response is much tighter also. Overall sound was open and accurate but that “magic mid” was less apparent. Could a less accurate EQ sound better (it is a matter of taste)? This final design remained a reference preamp for many years. To make an “apples to apples” comparison we used PSPICE models to compute amplitude response of the high level and phono stages (phono is deviation from standard RIAA curve). This allowed us to eliminate effects of tube transconductance and component tolerance. Actual response for the CA-15a MK2 design are also shown. Interestingly enough, the old MK1 version is sonically equal or better than several currently available tube preamps.
We hope you enjoyed our break-down of our classic custom preamp.
-MOB
ADDENDUM ADDED on 02/26/2012:
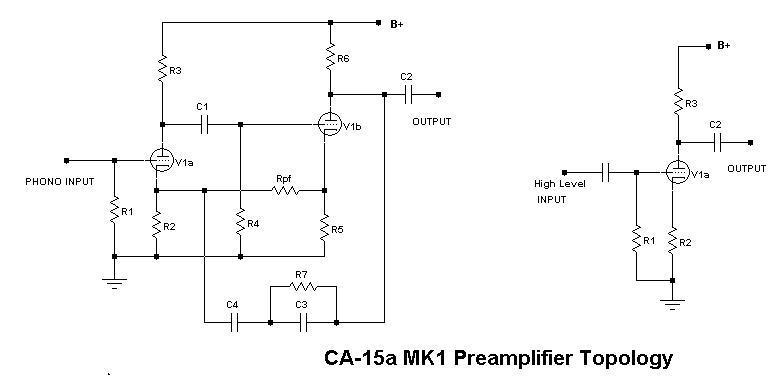
There have been multiple questions regarding the topologies described in the article. Here are the basic schematics showing the functional components for each revision (no supporting circuitry).
The CA-15a phono and high-level topological schematics are shown below. The original CA-15 is illustrated since the CA-15a is topologically identical, the differences being the power supply and the RIAA network values. The first stage of the phono circuit uses triode V1a in a standard common cathode arrangement with its gain defined by cathode resistor R2 and plate resistor R3. Blocking capacitor C1 and grid resistor R4 form the input circuit of V1b (also a common cathode arrangement). Notice the second stage has a bypass capacitor C5 across the cathode resistor R8 to maximize gain. The RIAA compensation is achieved by a feedback network made up of C3, C4, and R7, which returns to the cathode of V1a. Effects of output block capacitor C2 on the RIAA response is eliminated by placing it after the network. This is possible because C4 blocks DC from the plate of V1b. This was a popular circuit design for many old HiFi systems since it has minimum components count and was relatively simple to design. Most sonic differences stemmed from varying the gain ratios between stages and RIAA accuracy (although RIAA accuracy on many recordings is questionable to begin with). The high-level stage is an inverting Mu follower built around a single section of a dual triode. Gain is maximized by bypassing cathode resistor R2 with C5. Plate resistor R3 is optimized to provide maximum gain with the lowest possible output impedance since it must drive the feedback network and the load. Feedback network made up of R4 and R5 sets the gain and input impedance. Why didn’t we add a cathode follower at the output of each stage? Well, 95% of the DIY and commercial tube amps (Dynaco, McIntosh, Marantz, etc.) use that topology. We are experimenting with simplicity. The challenge is using only three dual triodes for an entire stereo preamp.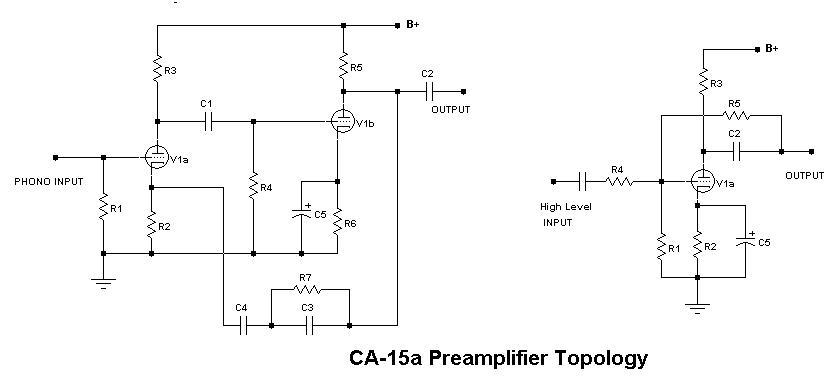
Looking at the MK1 schematic it is obvious that the phono sage is essentially the same as the CA-15a other than the addition of feedback resistor Rpf between cathodes. This arrangement provides a small amount of positive feedback, increasing open loop gain. This may very well be the reason for the openness and sweat midrange typical of this circuit. Optimization is a bit trickier since extra poles and zeros now show up in the transfer function. The more obvious change is in the high-level stage where the Mu follower is converted to a simple unbypassed common cathode with gain determined by R2, R3, and the mu of V1a. John Broskie has a variation that includes a cathode follower available as a kit. We have built many versions of this circuit and it does sound very natural! I highly recommend John’s Tube CAD Journal as a source of basic theory and some great new design ideas. I have only recently discovered the website, and I have to say, it is one of (perhaps “the”) best site on vacuum tube design I’ve seen. He also sells parts and kits for most of the circuits described in the articles making life easy for the DIY'er. I digress, back to the discussion at hand.
We cheated with the MK2 topology, still only three dual triodes, but we added a MOSFET for extra gain, and applied feedback. This circuit grew out of work done on interfacing custom feedback transducers. The original circuit used a JFET input device directly coupled to the MOSFET and a driven shield. Replacing the JFET with a vacuum tube was obvious. All stages are built around this basic configuration but actual component values vary from stage to stage. Design is a bit tricky since R2 and R5 provide global feedback, R5 and R4 set second stage gain, and R2 and R3 set first stage gain (a bit of interdependency, but nothing a good set of equations can’t solve). High voltage is also limited by the Vds of the P channel MOSFET which in turn limits gain available from the simple common cathode circuit. The phono stages run at relatively low current and high gain with a passive RIAA network (C2, C3, R6, R7, and R8) placed between stages. Blocking capacitor C1 allows us to use low voltage EQ capacitors, however the extra pole has to be included in the network design. Hope this answers some of your questions.
THANKS for reading! Until next time...
- MOB

